CANUTO DOCUMENTATION
Canuto WordPress Theme
Thank you for choosing Canuto. This guide explains how to install, configure, customize, translate, and update the theme and its optional companion plugin.
Last updated: August 25, 2026
2. Requirements
Before installing Canuto, confirm that the website meets these minimum requirements:
- WordPress 6.0 or newer.
- PHP 7.4 or newer.
- Canuto is tested up to WordPress 7.0.
- WooCommerce is optional and is required only when using WooCommerce products, payments, shipping, orders, customer accounts, cart, and checkout.
- Canuto Core 1.0.0 is recommended for individual Customizer product pages, virtual category pages, and the order request cart.
For production stores, use HTTPS and keep WordPress, WooCommerce, the theme, and all plugins updated.
3. Package Contents
If you received a complete download package, extract the main archive before installing anything in WordPress. The installable files are:
canuto.zip             Installable WordPress theme
Documentation/         This HTML user guide
The theme includes the recommended Canuto Core companion plugin internally at plugins/canuto-core.zip. WordPress offers it through the theme's recommended-plugin screen after activation; it is not installed as a theme.
Upload canuto.zip through the Themes screen. Uploading the complete download package instead of the installable theme ZIP can produce a “missing style.css stylesheet” error.
4. Theme Installation
Install from WordPress
- Sign in to the WordPress administration area.
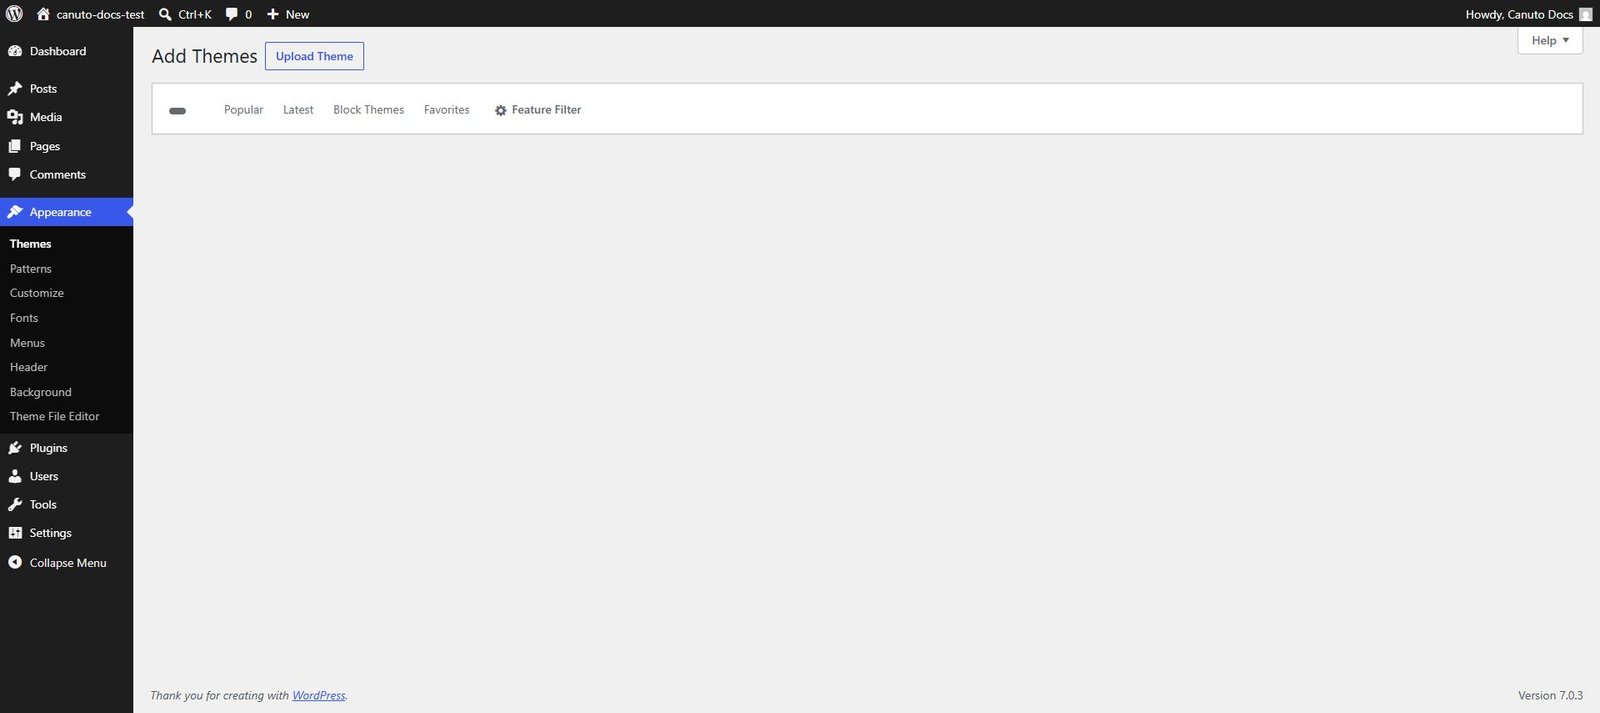
- Go to Appearance > Themes > Add New Theme > Upload Theme.
- Select
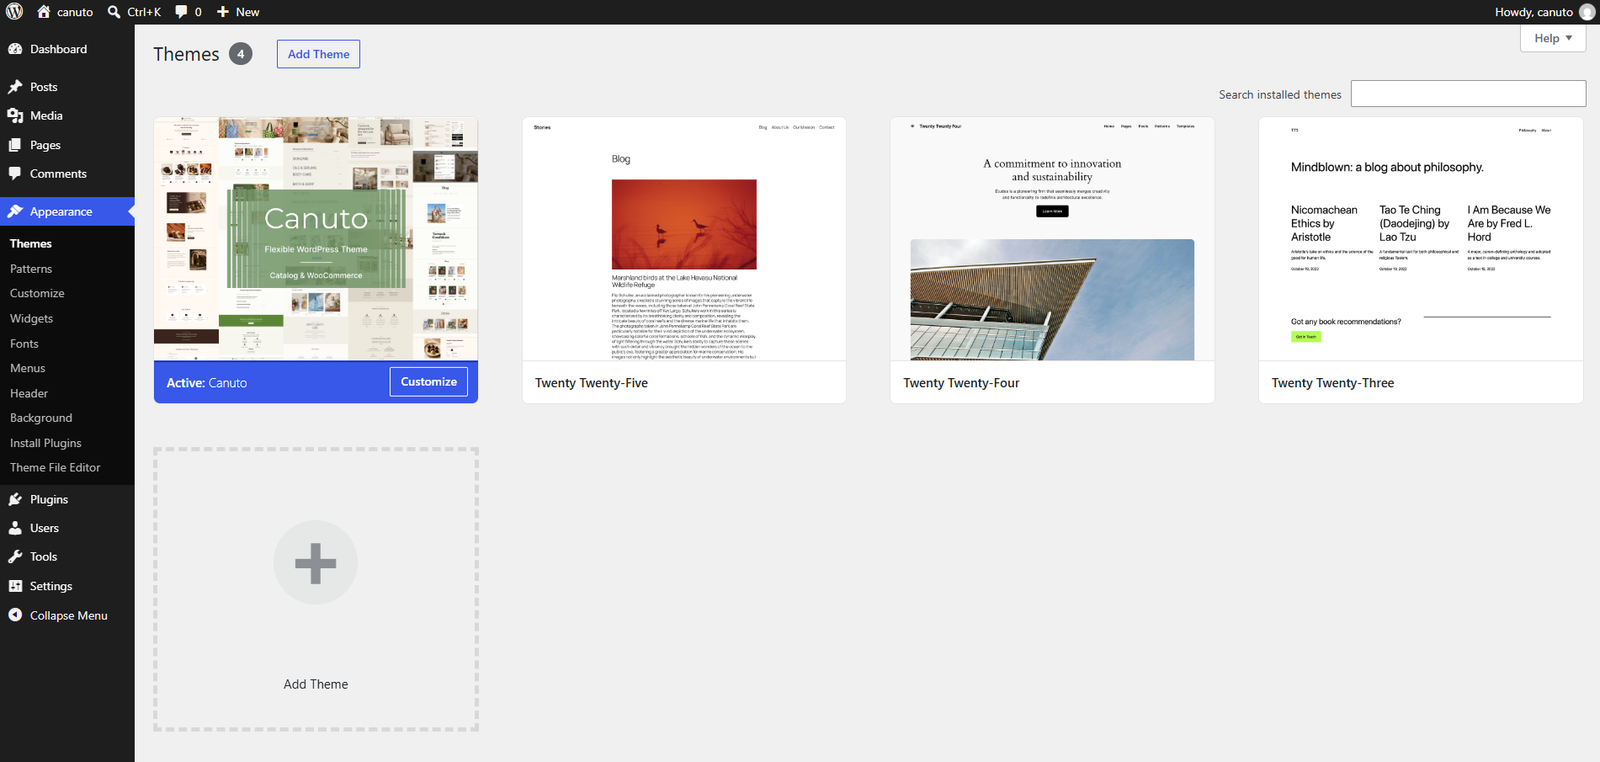
canuto.zipand choose Install Now. - When installation finishes, choose Activate.
Install with FTP or a hosting file manager
- Extract
canuto.zip. - Upload the resulting
canutofolder to/wp-content/themes/. - Go to Appearance > Themes and activate Canuto.
5. Installing Canuto Core
Canuto Core is the recommended, optional companion plugin for Canuto. It is bundled inside the theme at plugins/canuto-core.zip and is offered through the standard recommended-plugin interface after theme activation. The theme works without it.
- Install and activate the Canuto theme.
- WordPress displays Canuto Core as a recommended plugin after theme activation.
- Follow the recommendation to open the theme's plugin installation page.
- Select Canuto Core and run Install.
- When installation finishes, activate Canuto Core.

If the recommendation is unavailable, extract plugins/canuto-core.zip from a trusted copy of the Canuto theme package, then use Plugins > Add New Plugin > Upload Plugin. Do not upload the entire theme ZIP as a plugin.
If Canuto Core is inactive, the Customizer catalog can still be displayed on the landing page, but individual Customizer product pages, virtual category pages, product action buttons, and the request cart are unavailable. When WooCommerce is active without Canuto Core, WooCommerce becomes the product source automatically.
6. Initial Setup
STEP 1
Install the Theme and Recommended Plugins
Install and activate Canuto. Install Canuto Core when the site needs the extended Customizer catalog features, and install WooCommerce when the site needs a complete online store. Neither plugin is required for the theme's basic presentation.
STEP 2
Create Home
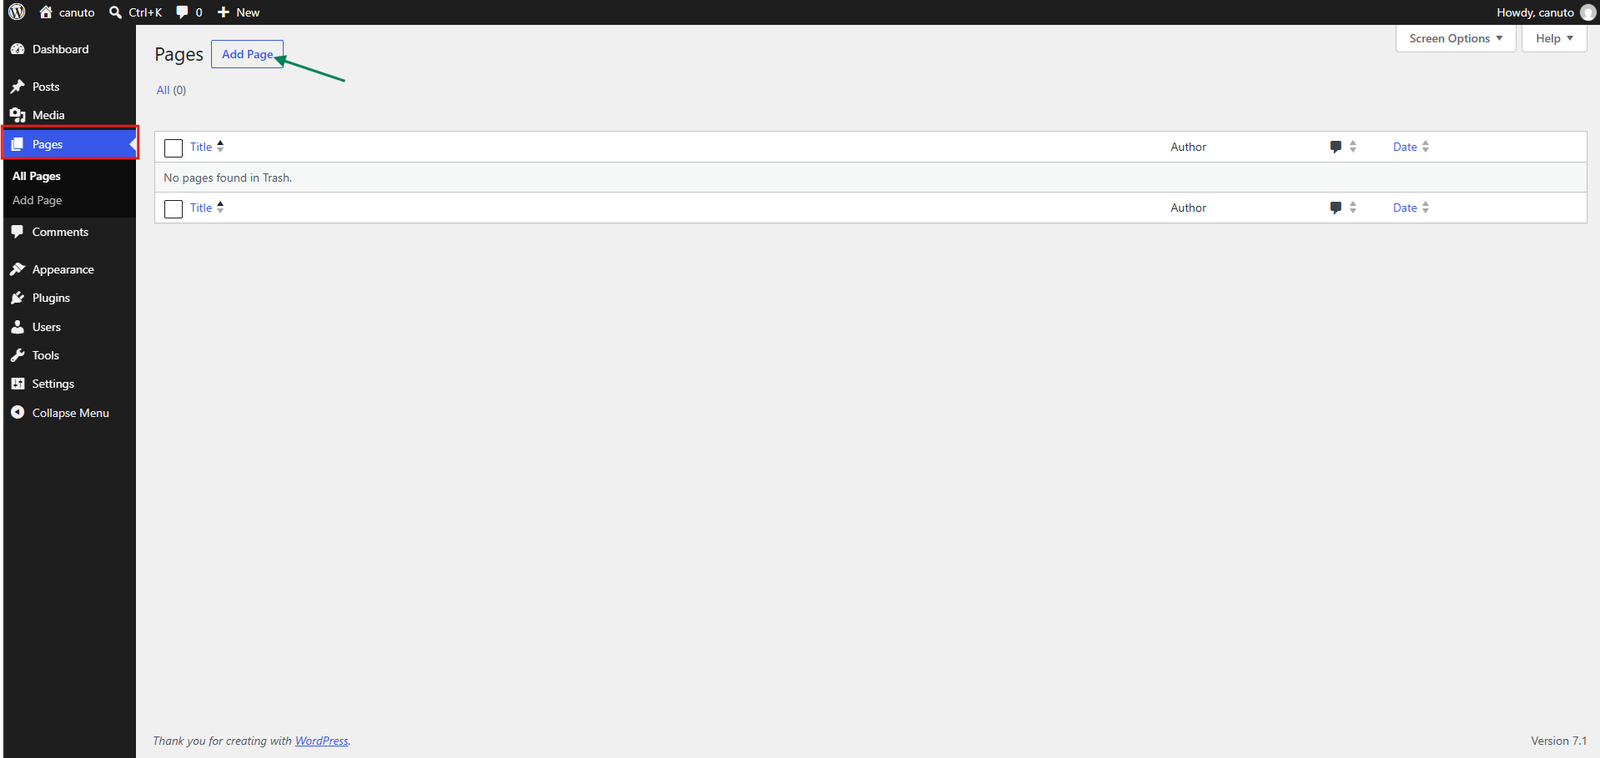
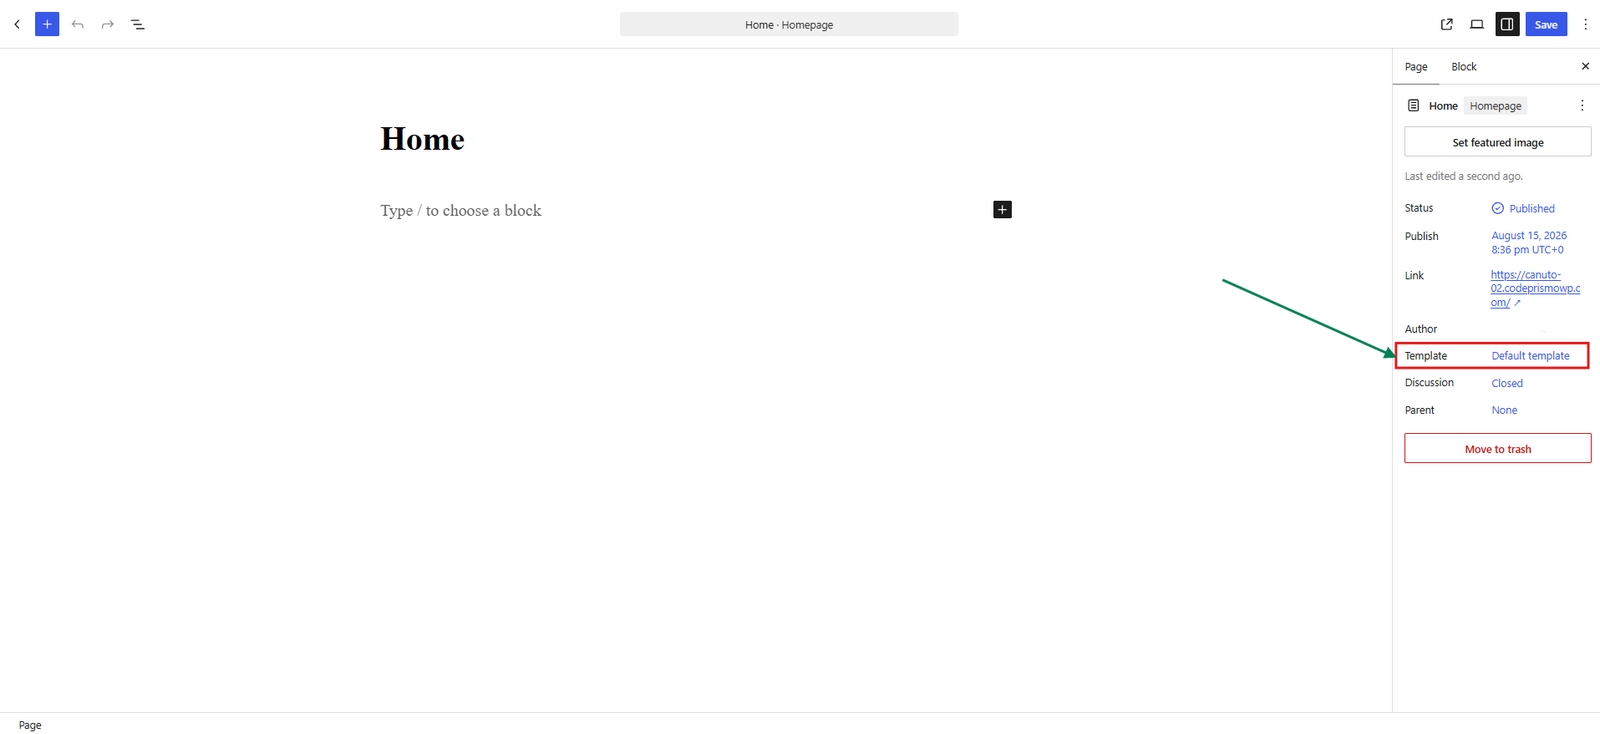
Go to Pages > Add New, name the page Home, keep Page Template set to Default, and publish it.
STEP 3
Create Blog
Go to Pages > Add New, name the page Blog, keep Page Template set to Default, and publish it. The page content can remain empty because WordPress supplies the posts listing.
STEP 4
Configure Reading Settings
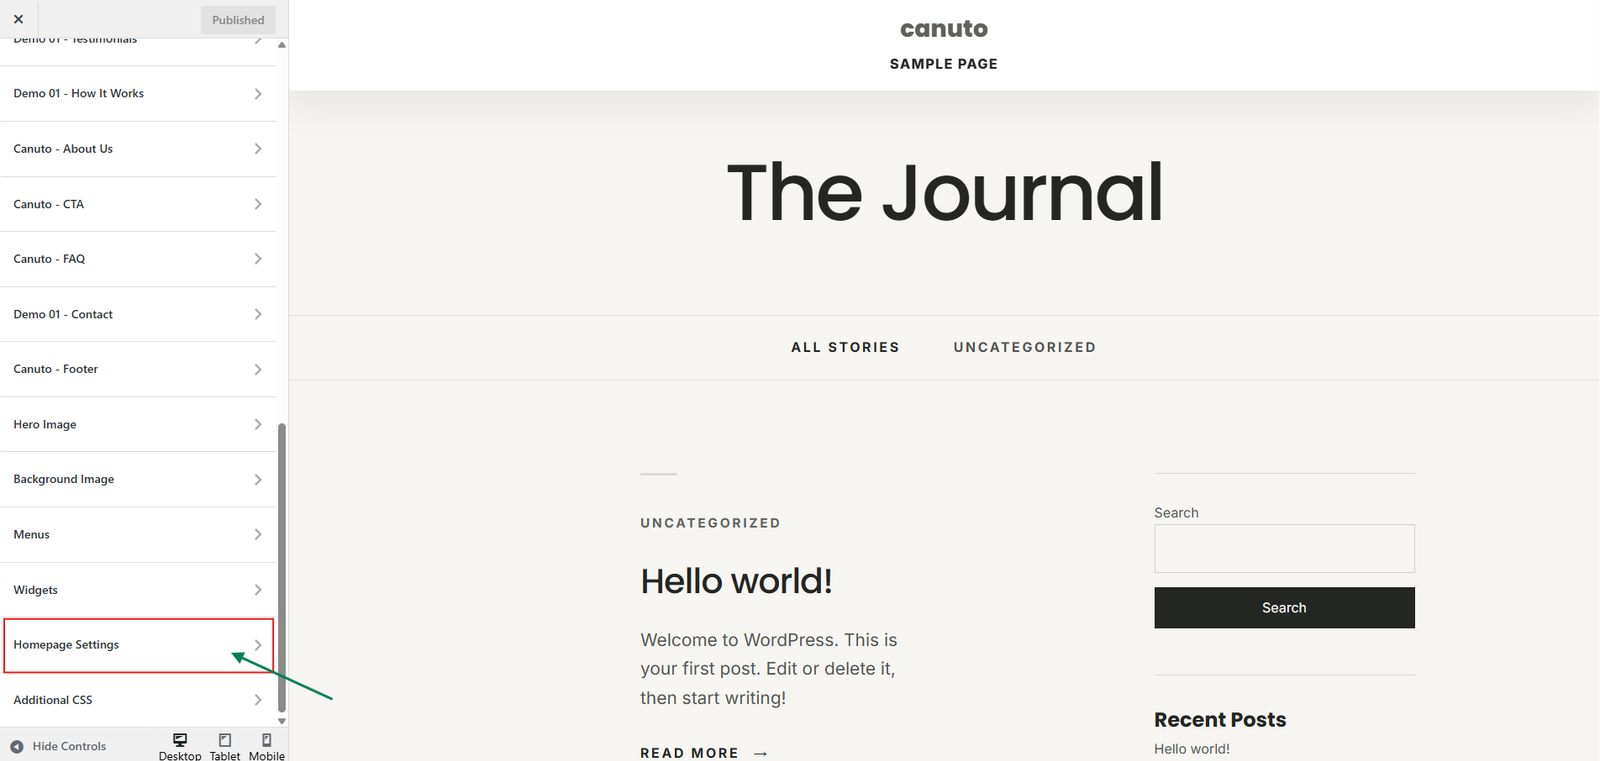
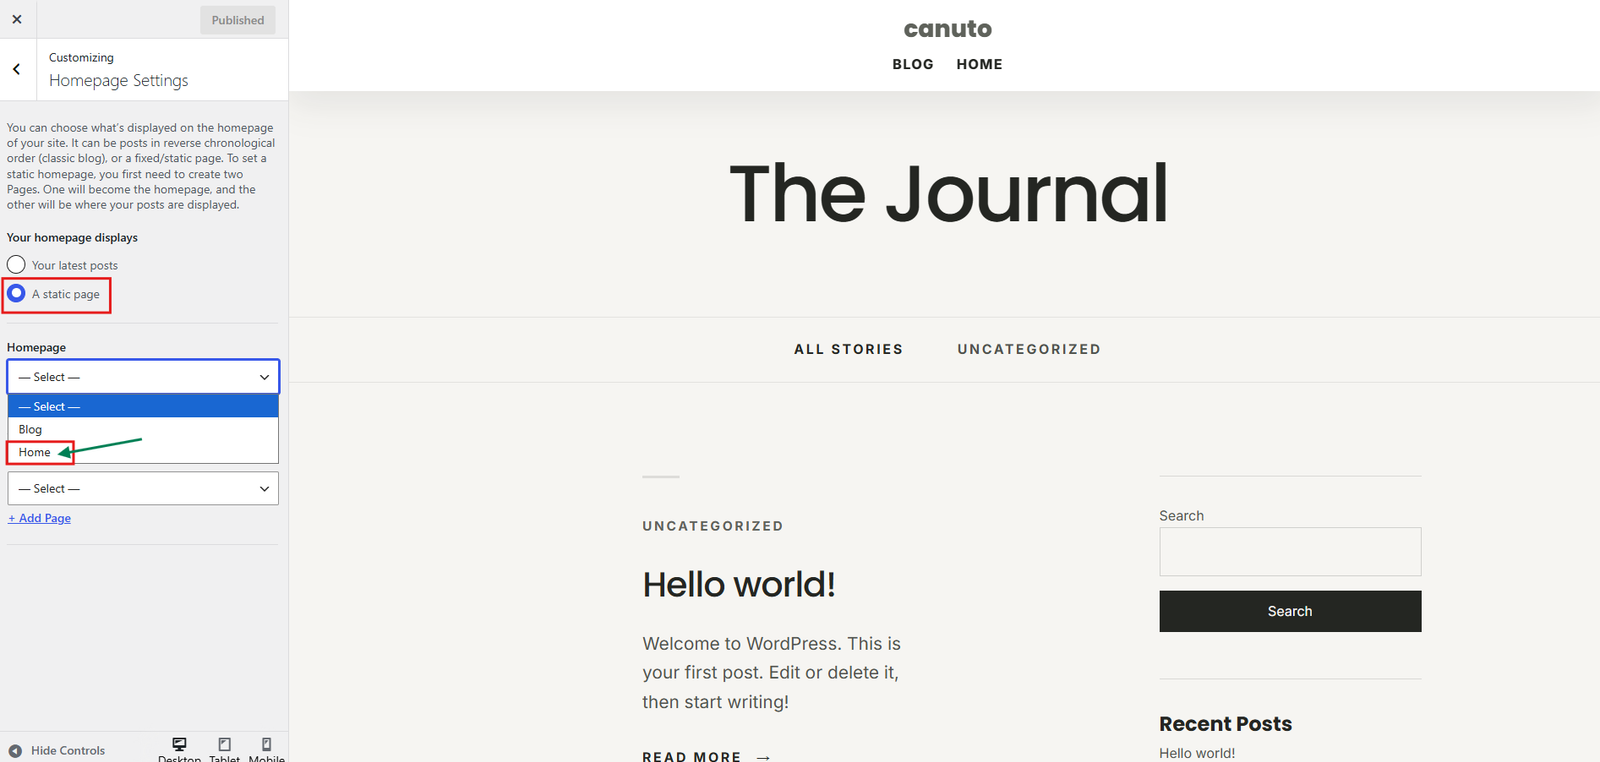
Go to Settings > Reading, or open Appearance > Customize > Homepage Settings. Under Your homepage displays, select A static page, choose Home as the Homepage, and choose Blog as the Posts page. Save or publish the changes.
STEP 5
Create and Assign Menus
Create the required navigation menus and assign them to Primary Menu, Footer Menu 1, and Footer Menu 2 as needed. See Header and Navigation for the shared menu procedure.
STEP 6
Select the Active Demo
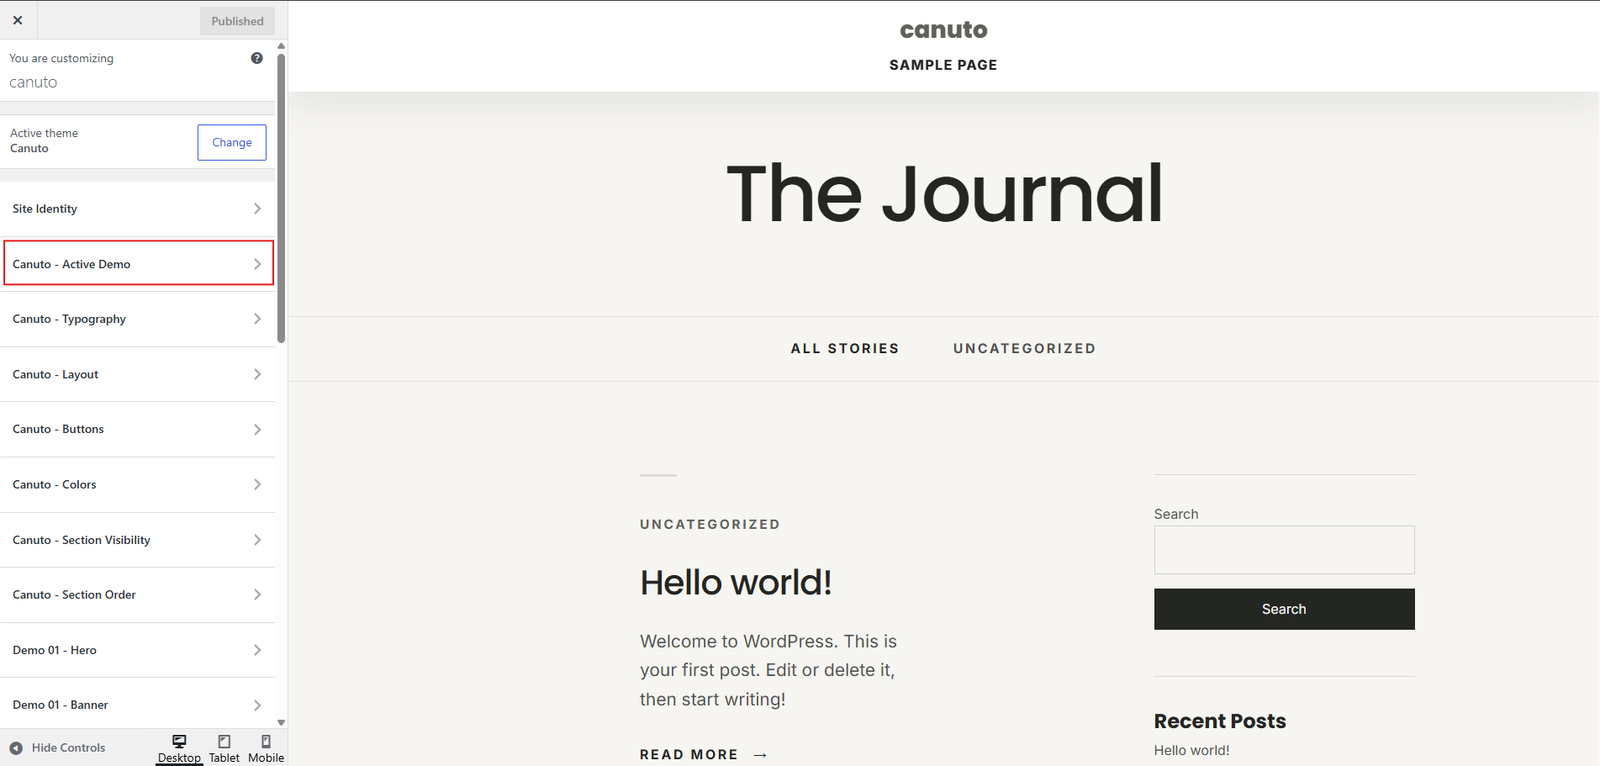
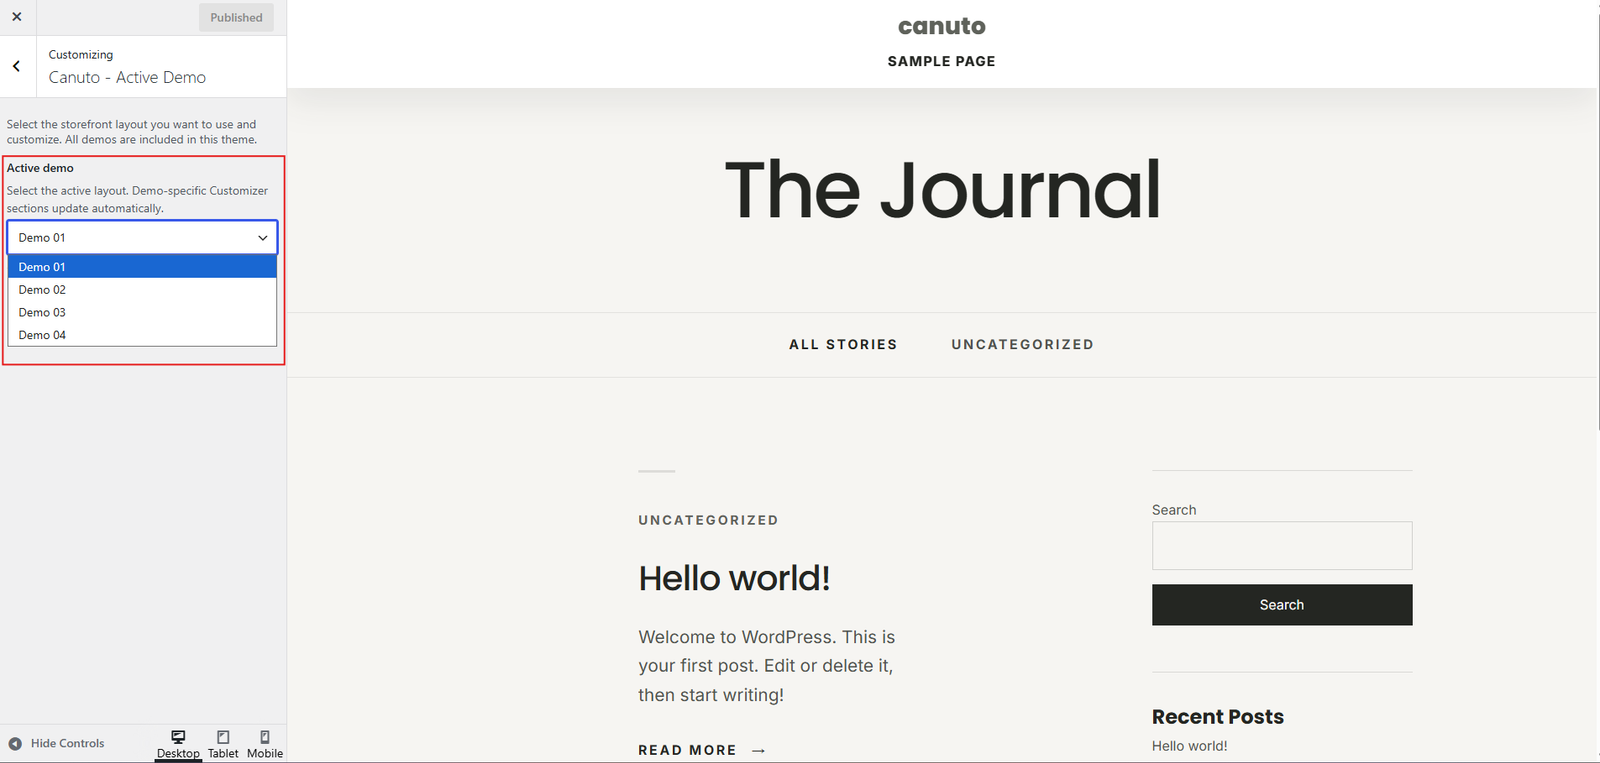
Open Appearance > Customize > Canuto - Active Demo and select Demo 01, 02, 03, or 04.
STEP 7
Add Homepage Content and Verify
Choose the product source in the active demo’s Products section when both WooCommerce and Canuto Core are active. Customize the content, colors, typography, layout, buttons, visibility, and section order, choose Publish, and verify the homepage.
Canuto does not include a setup wizard or one-click demo import. The four layouts are built into the theme and use editable Customizer defaults.
7. Demo Selection
Go to Appearance > Customize > Canuto - Active Demo. This is the official demo selector: choose Demo 01, 02, 03, or 04 here to select or switch the landing-page layout. You do not need to edit the homepage or change its Page Template. Each demo has its own structure; a section available in one demo is not necessarily available in another.
| Demo | Identity | Homepage sections | Distinctive content |
|---|---|---|---|
| Demo 01 — Chocolatier | Chocolate / confectionery | Hero, Products, Banner, Featured Product, About, Testimonials, How It Works, CTA, Contact, FAQ | Dedicated Featured Product and catalog/category presentation. |
| Demo 02 — Bags | Bags / accessories | Hero, Products, Banner, Featured Bundle, About, Testimonials, CTA, Contact, FAQ, Benefits, How It Works | Dedicated manual Featured Bundle. How It Works is hidden by default and can be enabled. |
| Demo 03 — Care | Skincare / body care | Hero, Products, Banner, Featured Products, About, How It Works, Testimonials, CTA, Contact, FAQ | Categories content, editorial Featured Products, and an adaptive CTA. |
| Demo 04 — Home | Furniture / home | Hero, Products, Banner, About, Testimonials, Contact, FAQ, Benefits, CTA | Separate Banner and CTA sections, editorial Categories content, and Benefits. |
The identities above describe the supplied preview content, not limitations of the layouts. Colors, typography, imagery, text, products, and section content can be adapted to another store or industry.
Changing the active demo changes the landing-page layout and exposes the relevant demo-specific Customizer sections. Saved settings for the other demos are retained.
Demo 01 — Chocolatier content
Customize Hero, Products and Categories, How It Works, Banner, Featured Product, About, Testimonials, FAQ, Contact, CTA, and Footer. Featured Product is a dedicated editorial section. Contact provides native section content, address, opening hours, phone, email, social links, button text and URL, and an optional map where available.
Demo 02 — Bags content
Customize Hero, Products, Benefits, Banner, Featured Bundle, About, Testimonials, FAQ, Contact, CTA, and Footer. Featured Bundle is editorial and manual: configure its label, title, text, button, image, and bundle points rather than selecting a product automatically. About includes an Eyebrow control. Contact uses native contact information, social links, button controls, and an optional image.
Demo 03 — Care content
Customize Hero, Products, Categories, Banner, Featured Products, How It Works, Testimonials, About, FAQ, Contact, CTA, and Footer. Categories provides Section title, Section description, and Link text; its destination is chosen automatically by the current product architecture. Featured Products is an editorial presentation based on the active product source, not the Product Source selector itself. CTA displays image and content together when an image is selected; without an image, the layout adapts and centers the content.
Demo 04 — Home content
Customize Hero, Products, Categories, Banner, About, Testimonials, Contact, FAQ, Benefits, CTA, and Footer. Categories provides Section title, Section description, Link text, and Badge text. Products supports Product Background, Product Border Color, Product Border Radius, Product Border Width, and Product Button controls. Product Card Style and Product Shadow are not available for Demo 04.
Demo 04 Banner and CTA are separate sections. CTA provides content, button text and URL, an optional image, Visibility, and Order. Without an image, the CTA adapts its layout for the content. Contact provides section content, address, opening hours, phone, email, social links, button text and URL, and an optional image.
8. Customizer Overview
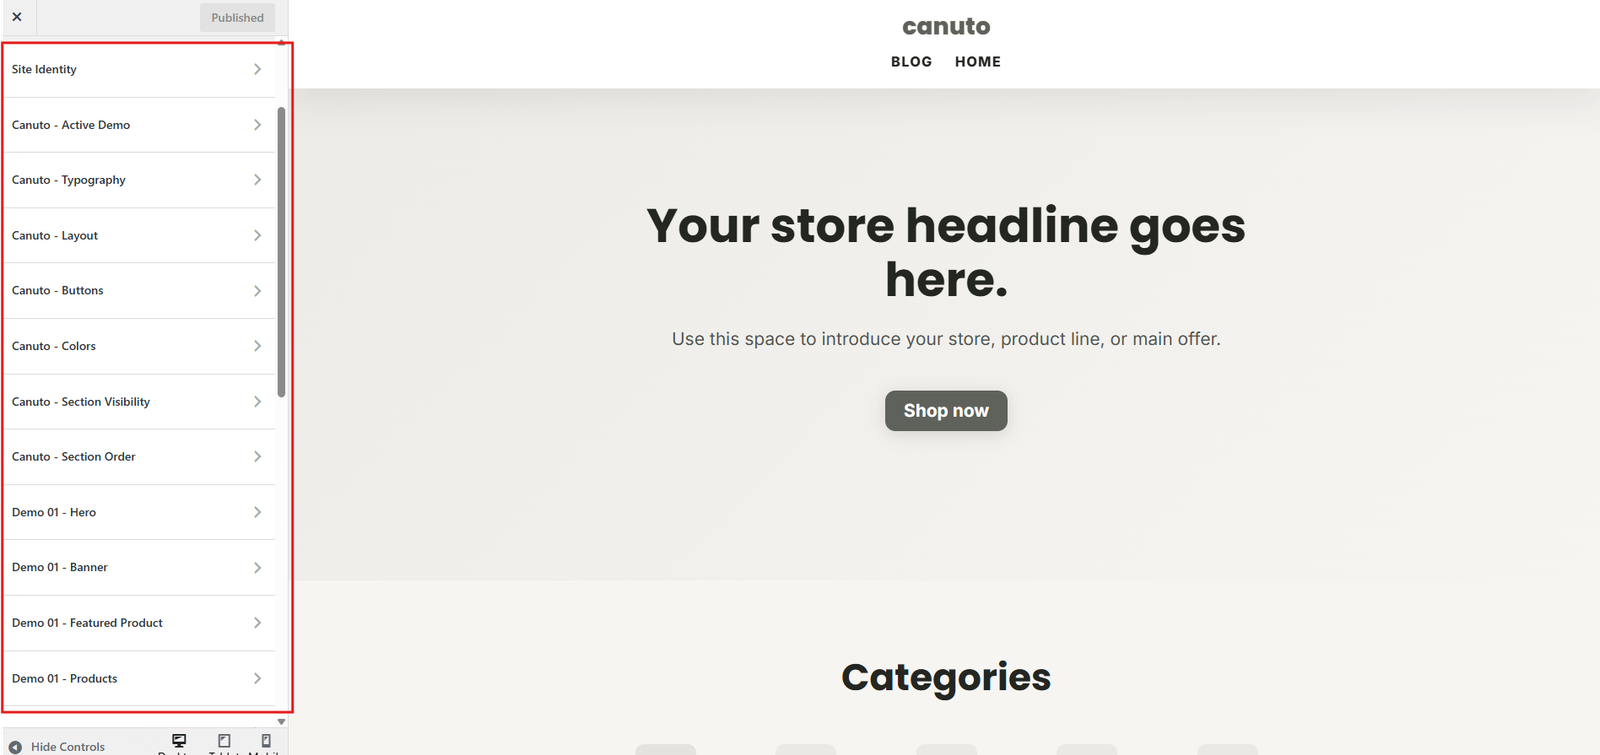
Open Appearance > Customize. Canuto adds global controls and demo-specific content controls. Only sections relevant to the active demo are displayed.
Design
- Canuto - Colors: global and component color controls.
- Canuto - Typography: heading, body, navigation, button, and supporting-text typography.
- Canuto - Layout: widths, spacing, borders, radii, and other layout options.
- Canuto - Buttons: shared button appearance.
Structure
- Canuto - Active Demo: selects the landing layout.
- Canuto - Section Visibility: shows or hides supported homepage sections.
- Canuto - Section Order: reorders sections with drag-and-drop or accessible arrow controls.
Content
- Demo 0X - Banner: Banner controls for the active demo.
- Canuto - FAQ: shared FAQ content and visibility.
- Canuto - Footer: shared brand, menu-column titles, social title, and copyright. Footer navigation items are managed with the native WordPress menu system.
Hero, Products, Categories, Testimonials, and Contact can expose controls specific to the active demo. Featured Product, Featured Bundle, Benefits, How It Works, About, and CTA vary according to the selected layout. Banner is available in all four demos.
Canuto - Buttons is one section containing two control families: General / Primary Buttons and Product Buttons. There is no separate global Customizer section named “General Buttons.”
Sections use practical headings such as Section content, Additional content, Buttons, Image and background, Product display, Category items, Contact information, Social links, Brand, Menu 1, Menu 2, and Copyright. Labels such as Eyebrow, Section title, Section description, Button text, Button URL, Quote, Customer name, Role or job title, Rating, Question, Answer, Text icon, Link text, and Column title describe the content directly.
9. Header and Navigation
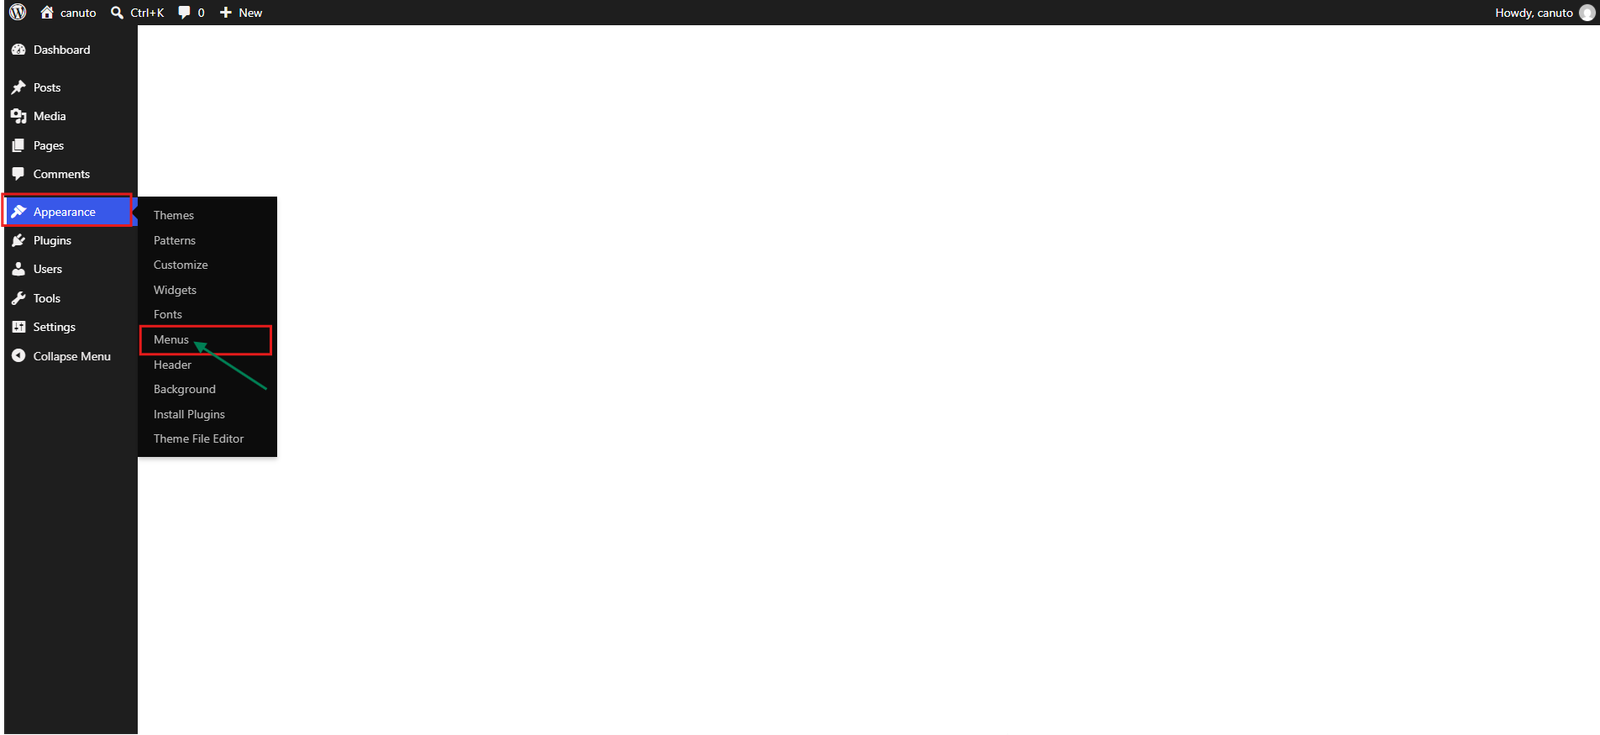
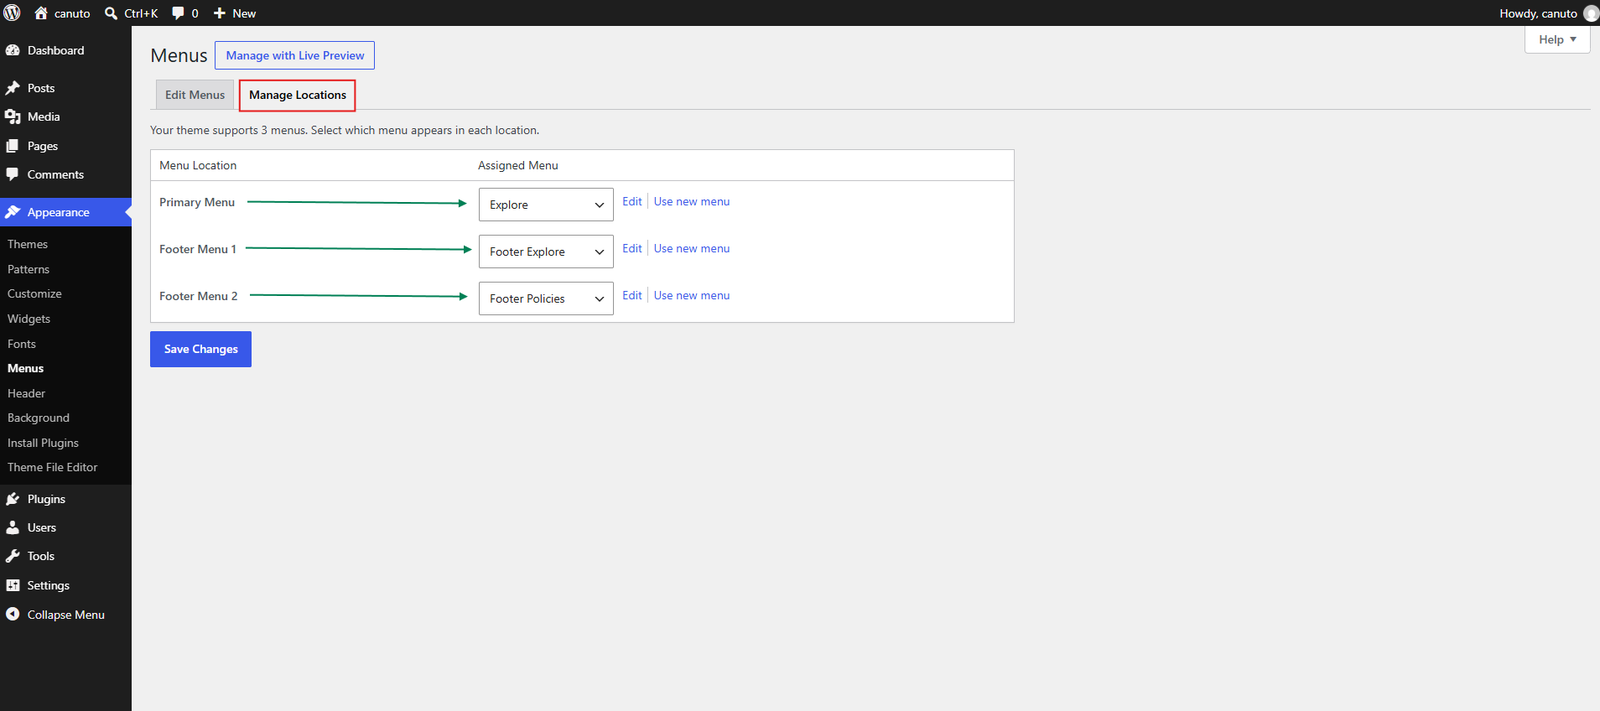
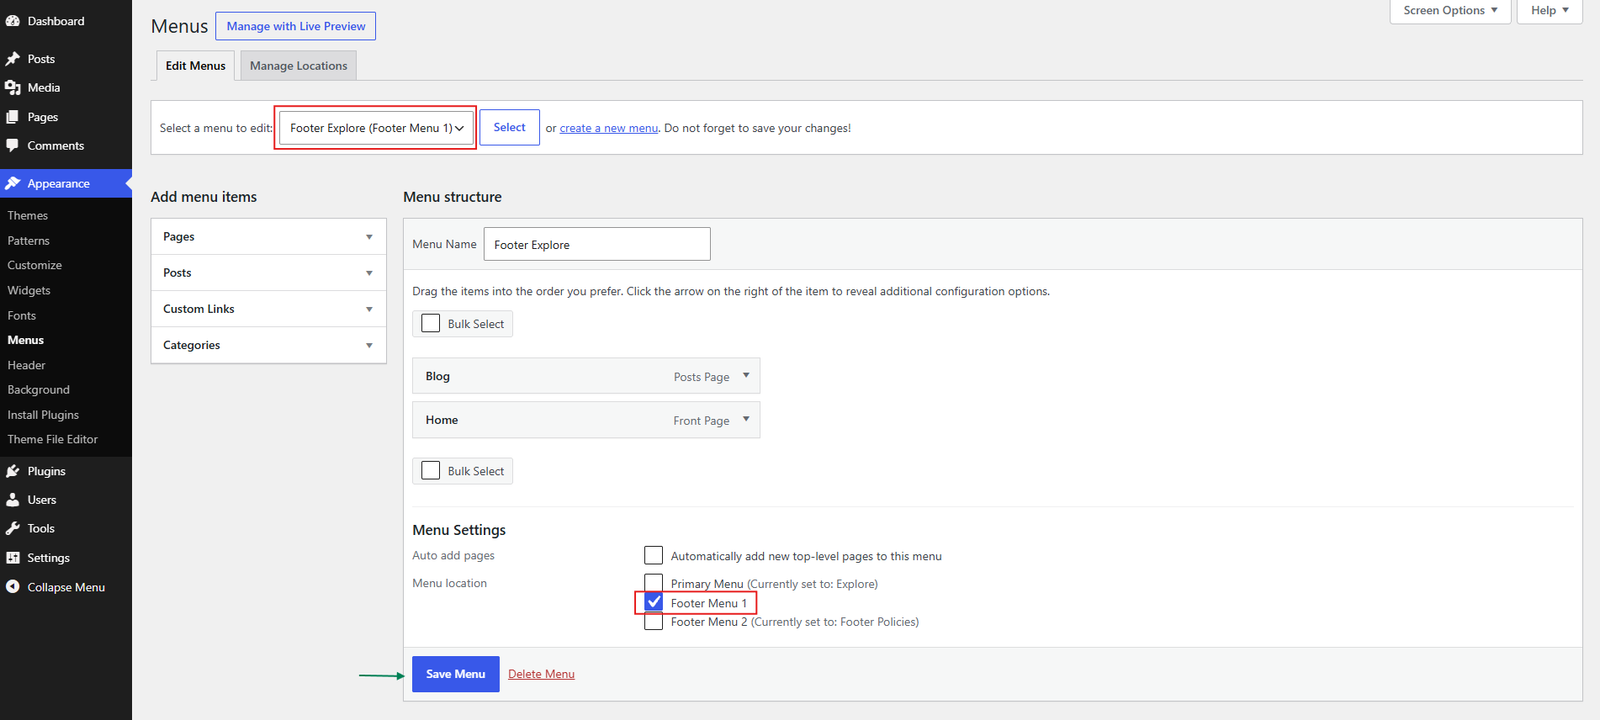
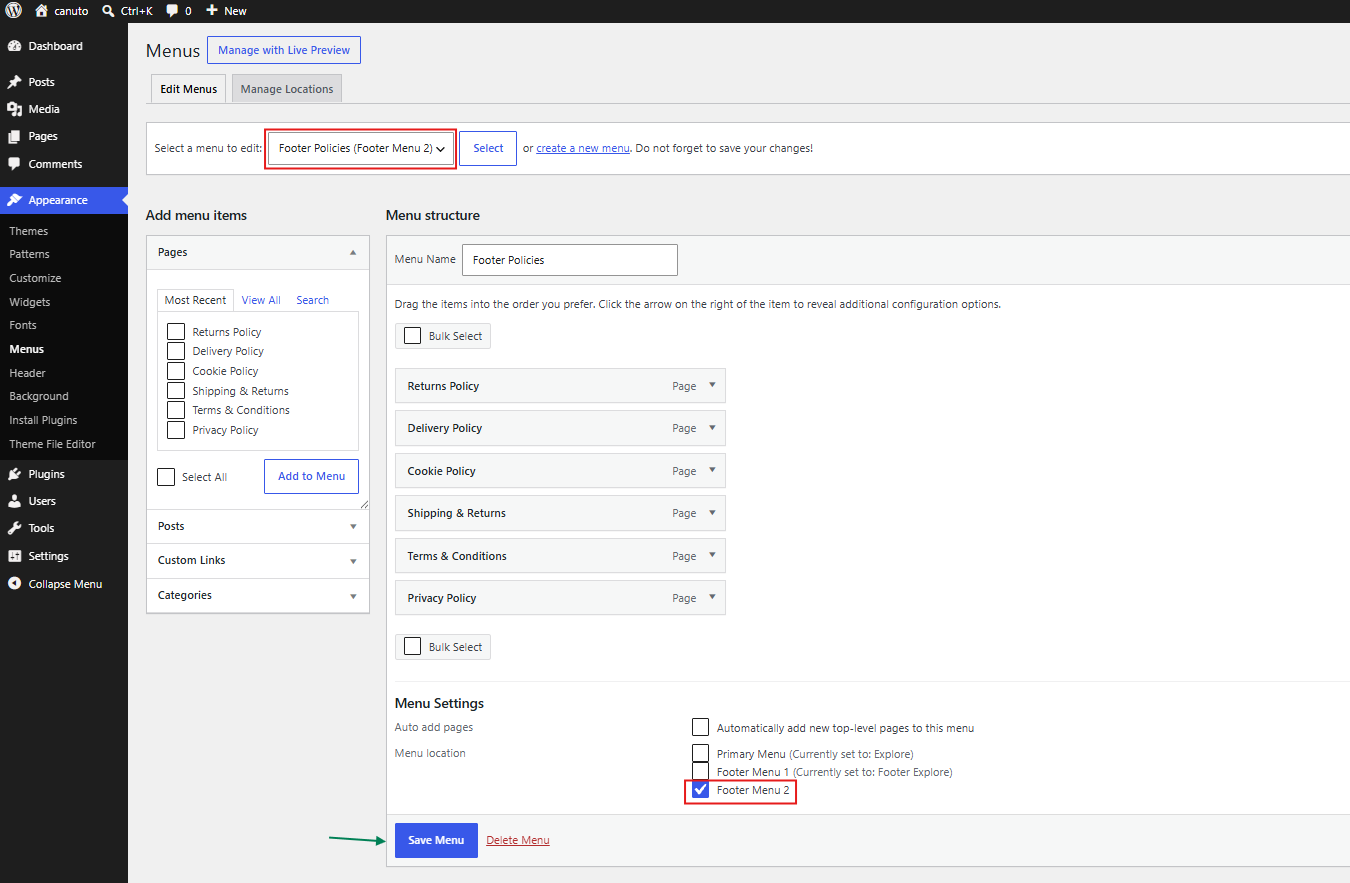
Canuto registers three native WordPress menu locations: Primary Menu, Footer Menu 1, and Footer Menu 2. Find them under Appearance > Menus > Manage Locations. Depending on the WordPress interface, the same assignments may also be available in the menu editor under Menu Settings.
STEP 1
Create a Menu
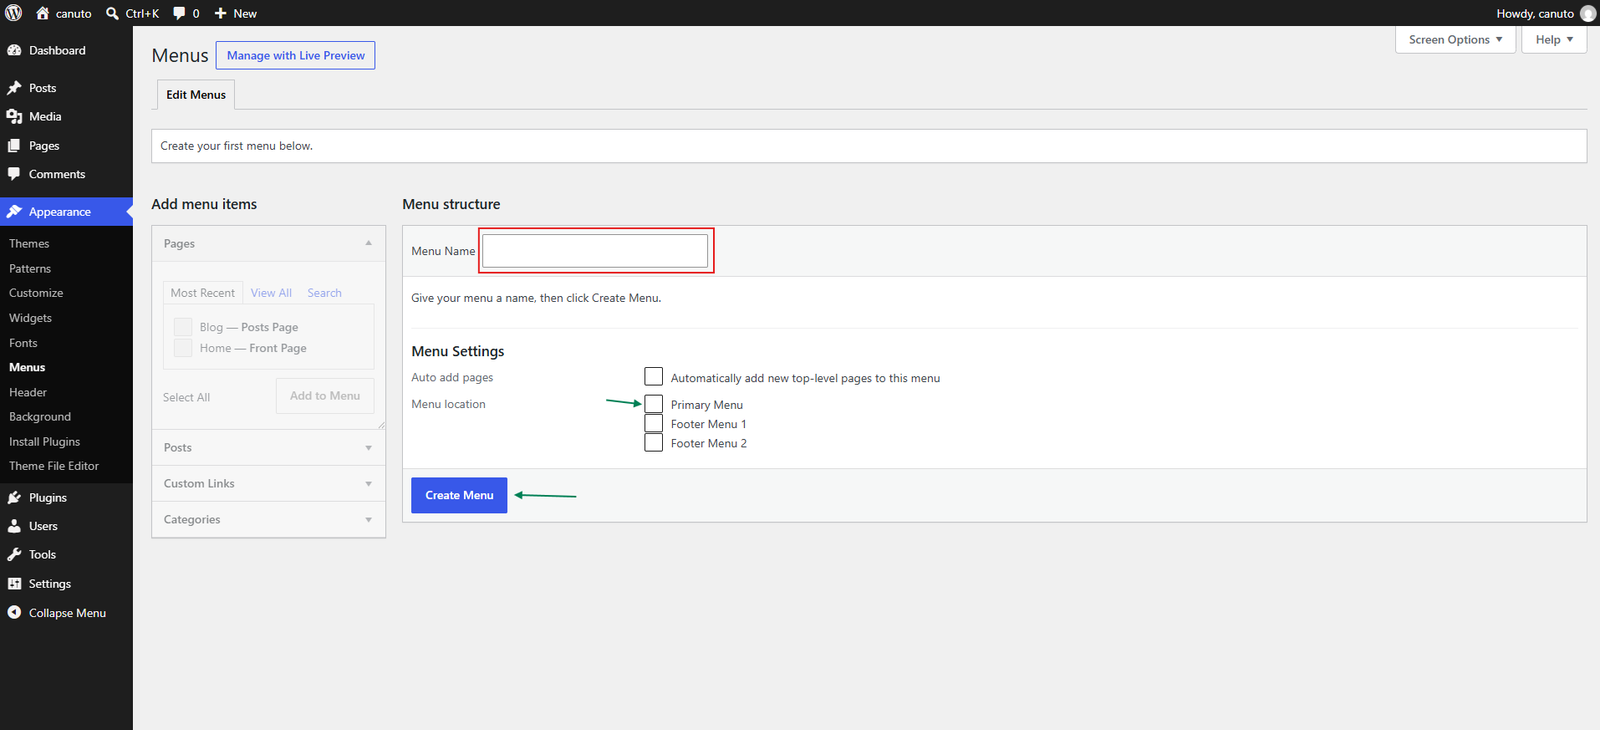
Go to Appearance > Menus, create a menu, and give it any descriptive internal name.
STEP 2
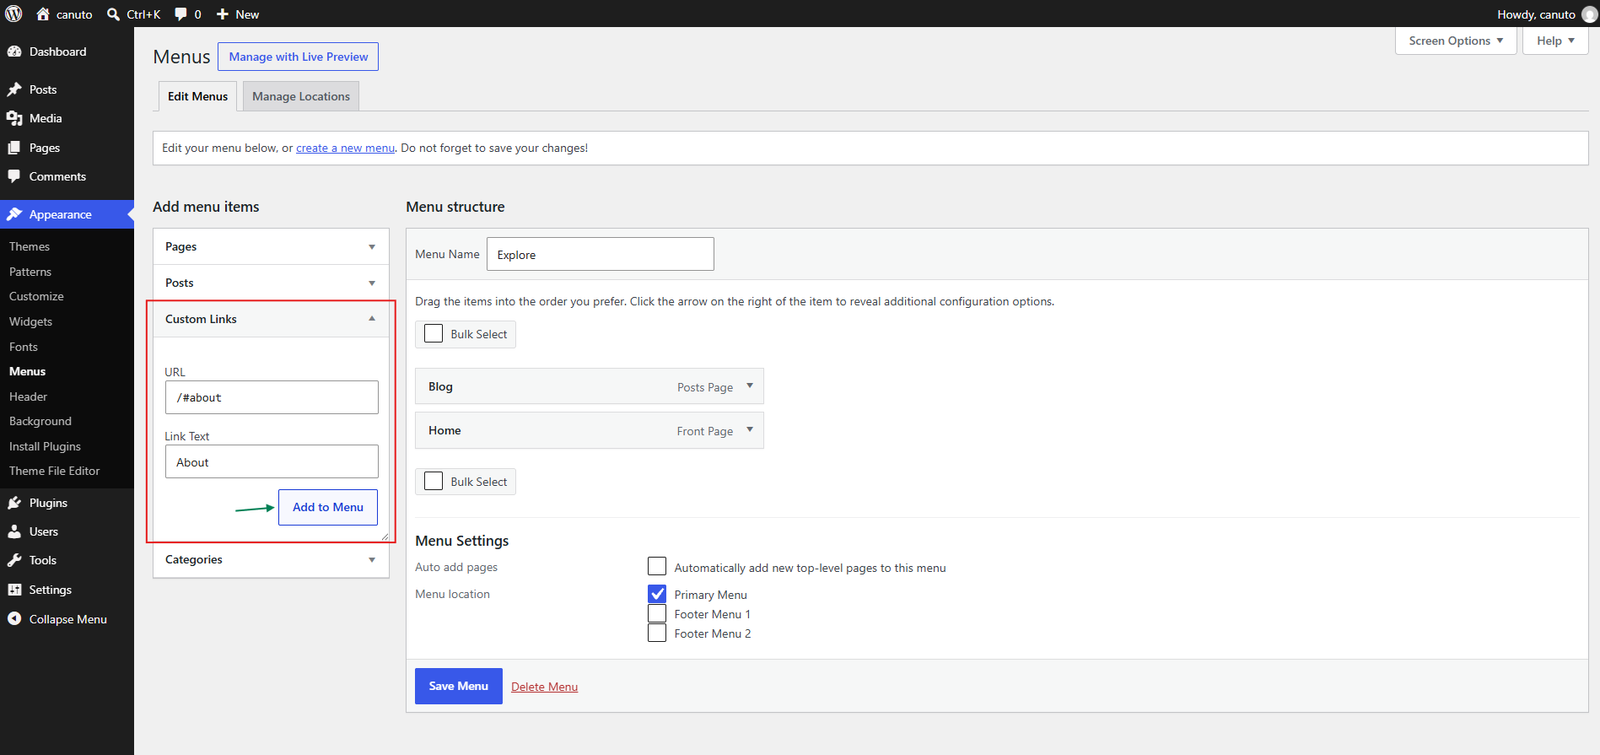
Add Menu Items
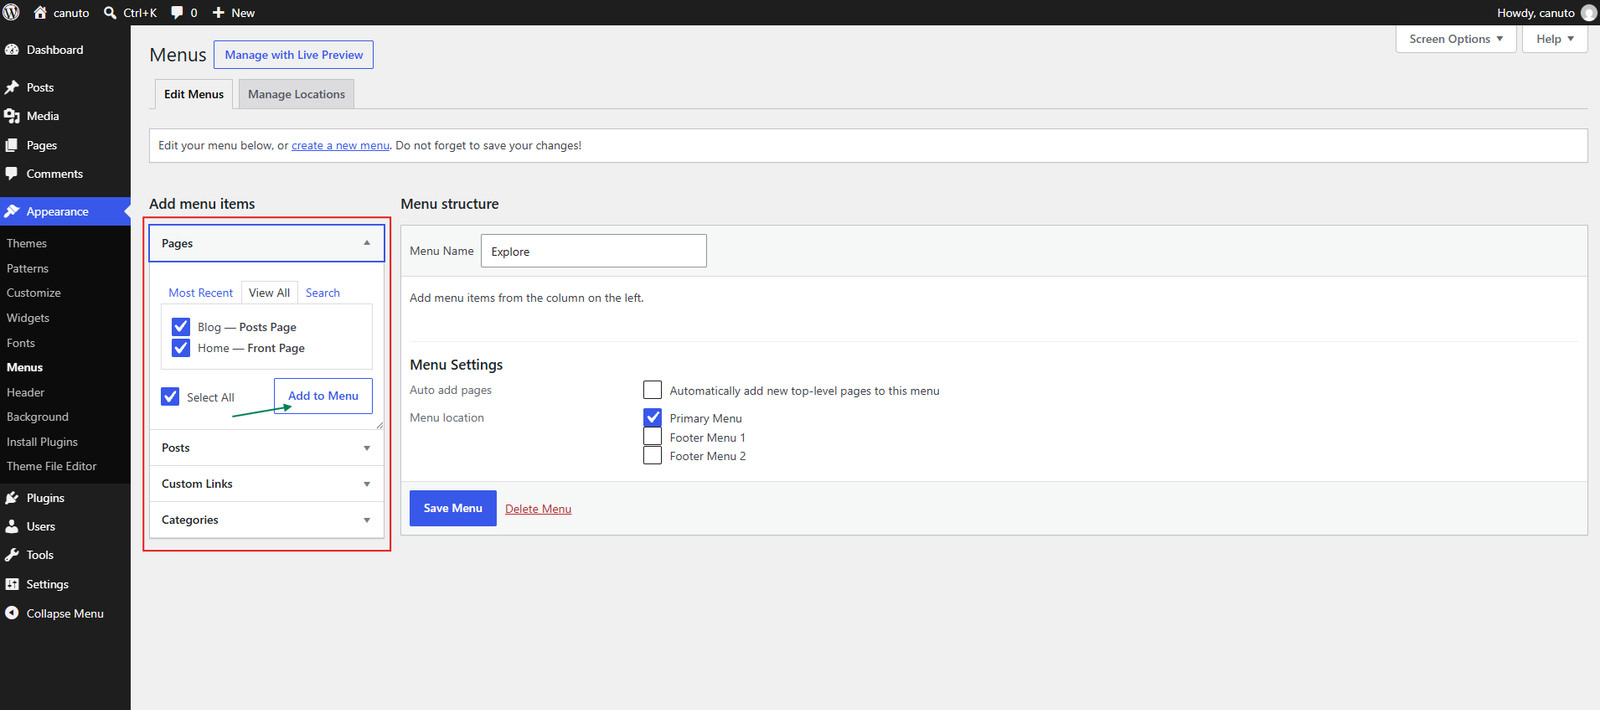
Add the desired pages, custom links, categories when applicable, or other item types supported by WordPress.
STEP 3
Assign a Menu Location
Assign the menu to Primary Menu, Footer Menu 1, or Footer Menu 2 according to where it should appear.
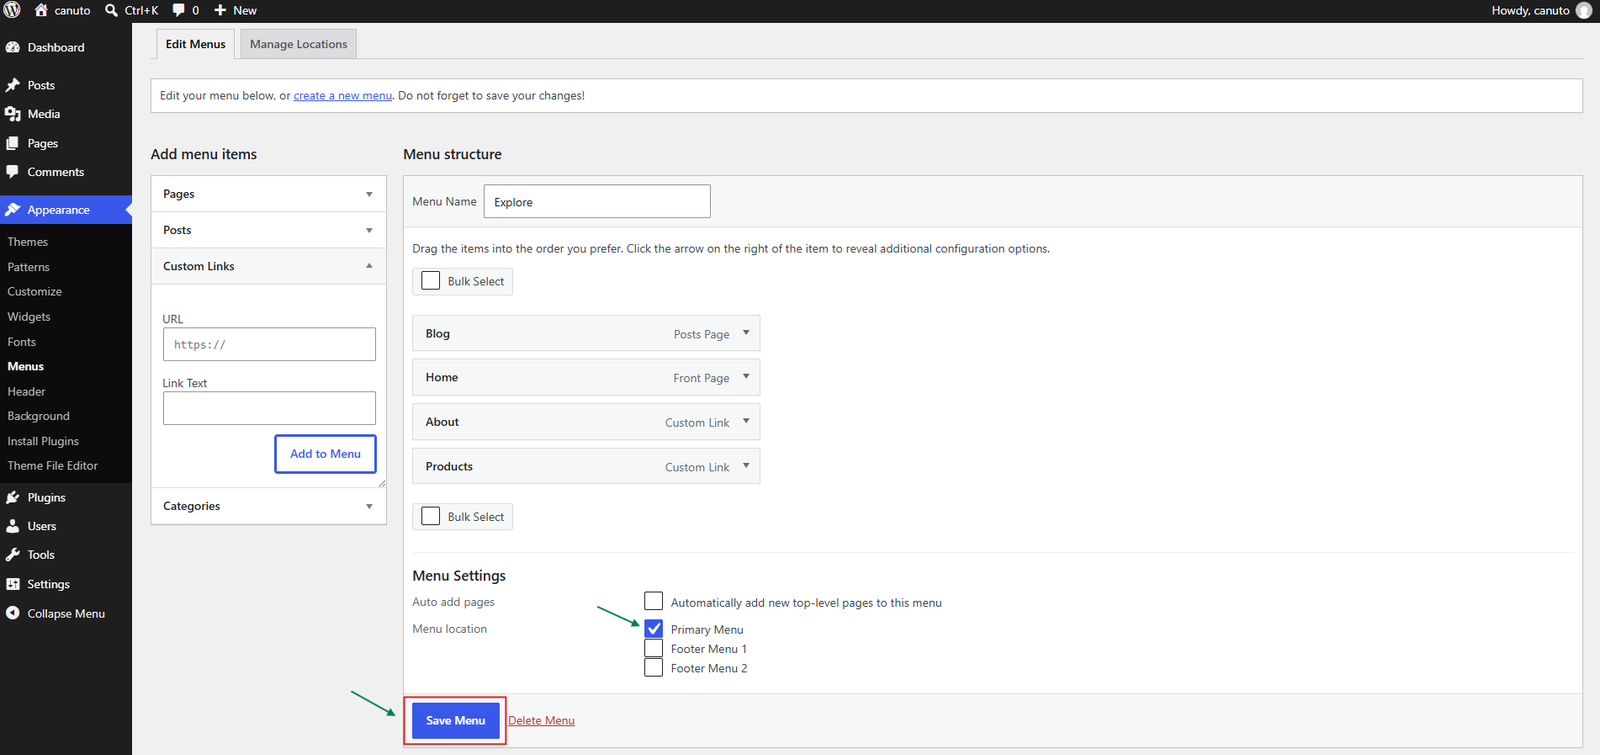
STEP 4
Save the Menu
Choose Save Menu and confirm the assigned location under Manage Locations.
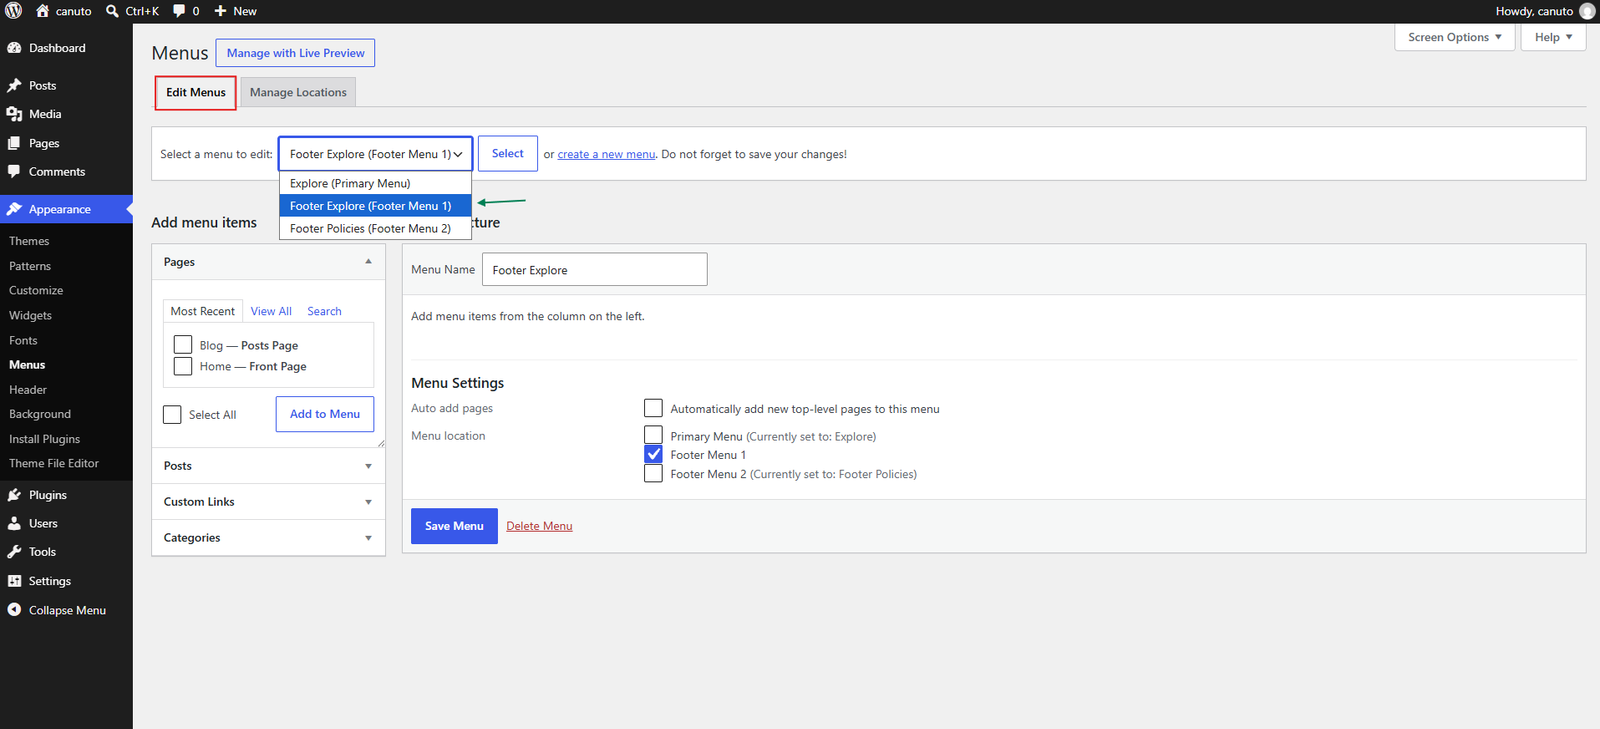
STEP 5
Repeat for Footer Locations
Create and assign separate menus for the footer locations when the website needs footer navigation.
Menu locations
| Menu Location | Purpose |
|---|---|
| Primary Menu | Main site navigation. |
| Footer Menu 1 | Quick links or the first footer navigation column. |
| Footer Menu 2 | Policies, institutional links, or secondary navigation. |
Footer Menu 1
Footer Menu 1 controls the first navigation column in the footer. For example, create a menu named Footer Explore containing Blog, Latest Stories, Shop, and Collections. The theme does not limit this location to four links.
Footer Menu 2
Footer Menu 2 is commonly used for institutional or legal navigation. For example, create a menu named Footer Policies containing Privacy Policy, Terms & Conditions, Shipping & Returns, and Cookie Policy. These names and uses are examples only.
One-page links
Use Custom Links to navigate directly to sections on the homepage when those sections are present:
- Home:
/#hero - Shop:
/#products - About:
/#about - Contact:
/#contact
The leading slash returns visitors to the homepage before opening the section. If WordPress is installed in a subdirectory or the homepage uses a different URL, use the complete homepage URL followed by the anchor. Add an anchor only for a section that is present in the selected demo.
Suggested Demo 01 structure
| Location | Suggested items |
|---|---|
| Primary Menu | Home, Shop, About, Blog, FAQ, Contact |
| Footer Menu 1 | Shop, About, Blog, FAQ |
| Footer Menu 2 | Privacy Policy, Terms of Use, Cookie Policy |
This is a suggested structure for Demo 01, not a requirement.
The Customizer provides demo-specific header and branding controls. WordPress also provides Site Identity for the site title, tagline, site icon, and Custom Logo. Upload a clean logo file with suitable transparent space; the theme does not remove whitespace embedded inside the image. Demo 03 includes additional messages displayed above the navigation.
10. Design Controls
Colors
Canuto - Colors groups controls for the base palette, text, backgrounds, header, forms, cards, products, CTA, footer, and interactive states. The active demo determines which values and compatible components consume each control; not every component is present in every demo.
Typography
Canuto - Typography includes Body Font, Heading Font, Base Font Size, Heading Weight, logo typography, Hero typography, section titles, product title and body text, and footer titles. Available heading weights include Regular (400).
Layout
Canuto - Layout provides design controls such as widths, spacing, padding, gaps, border radius, border dimensions, shadows, and component dimensions. These settings affect compatible Canuto components; this section is not a free-form page builder.
General Buttons
Canuto - Buttons contains a General buttons group for compatible editorial actions such as Hero, Banner, Contact, and CTA buttons. Available controls include style, font size, font weight, text style, vertical and horizontal padding, border radius, colors, border, hover colors, and hover effect where applicable. A section can use only the controls supported by its layout.
Product Buttons
The separate Product buttons group controls compatible product actions. Current styles are Filled, Outline, Filled with outline, Text only, and Gradient. Controls include text size, font weight, text style, vertical and horizontal padding, border radius, colors, border and hover states. Product Buttons are not the same as General Buttons.
11. Hero
Every demo includes editable Hero content, but the available fields depend on its layout. Image controls use the WordPress Media Library. The following image concepts are separate:
| Control | Purpose |
|---|---|
| Hero Image | Main content or side image used by demos that provide this control. |
| Hero background image | Background of the Hero section. Each demo keeps its own saved background. |
| Site Background | General WordPress background for the site or page, separate from the Hero background. |
Use the Hero Image Customizer section for the active demo's Hero background image. Use the corresponding Canuto Demo 0X - Hero section for its content fields and, where available, its separate Hero image.
- Demo 01: Section title, Section description, Button text, Button URL, Hero image, optional information items, and a demo-specific Hero background image.
- Demo 02: Section title, Section description, primary and secondary Button text and Button URL, Hero image, optional information items, and a demo-specific Hero background image.
- Demo 03: Eyebrow, Section title, Section description, primary and secondary Button text and Button URL, signature text, and a demo-specific Hero background image. Demo 03 does not provide a separate content or side Hero image control.
- Demo 04: Section title, Section description, primary and secondary Button text and Button URL, Hero side image, and a demo-specific Hero background image.
Clearing an image control removes the selected media; the theme may display its bundled placeholder or render the component without that image according to the active layout.
12. Product Modes
Canuto supports two product workflows for different needs. Neither mode is inherently better: choose the lightweight catalog when products are primarily presented or requested, and choose WooCommerce when the website needs a complete online store.
SIMPLE MODE
Canuto Core / Customizer Products
Managed in: Appearance > Customize
This simplified mode is suitable for presenting products without a full WooCommerce store. Canuto Core is recommended but optional: the homepage catalog works without it, while the companion plugin supplies individual virtual product and category pages, product actions, and the browser-based order request cart.
COMPLETE ECOMMERCE
WooCommerce Products
Suitable for: Simple and variable products
This mode provides managed inventory, product and variation SKUs, attributes, categories, transactional Cart and Checkout, customer accounts, and WooCommerce store administration.
| Feature | Customizer Products | WooCommerce Products |
|---|---|---|
| Product management | WordPress Customizer. | WooCommerce Products screens. |
| Setup | Lightweight product presentation. | Complete eCommerce setup. |
| Product source | Customizer Products. | WooCommerce Products. |
| Variations | Not available in Customizer Products mode. | Available through variable products. |
| Inventory | No managed inventory; Availability is display text. | Managed by WooCommerce. |
| SKU | Optional display field; no variation SKUs. | Product and variation SKUs. |
| Cart and checkout | Request cart with Canuto Core; no financial checkout. | WooCommerce transactional cart and checkout. |
| Product pages | Virtual product pages with Canuto Core. | WooCommerce single-product pages. |
| Best for | Simple product presentation and order requests. | A complete online store. |
How Product Source is selected
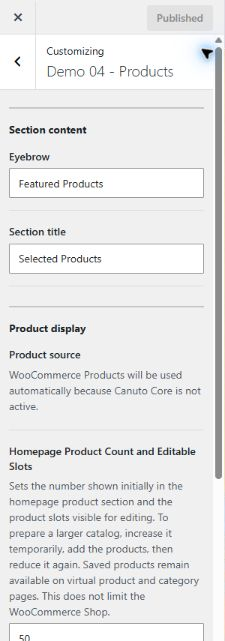
When WooCommerce is active and Canuto Core is not active, Canuto automatically uses WooCommerce Products. No manual source selection is required, and the Customizer displays: WooCommerce Products will be used automatically because Canuto Core is not active.
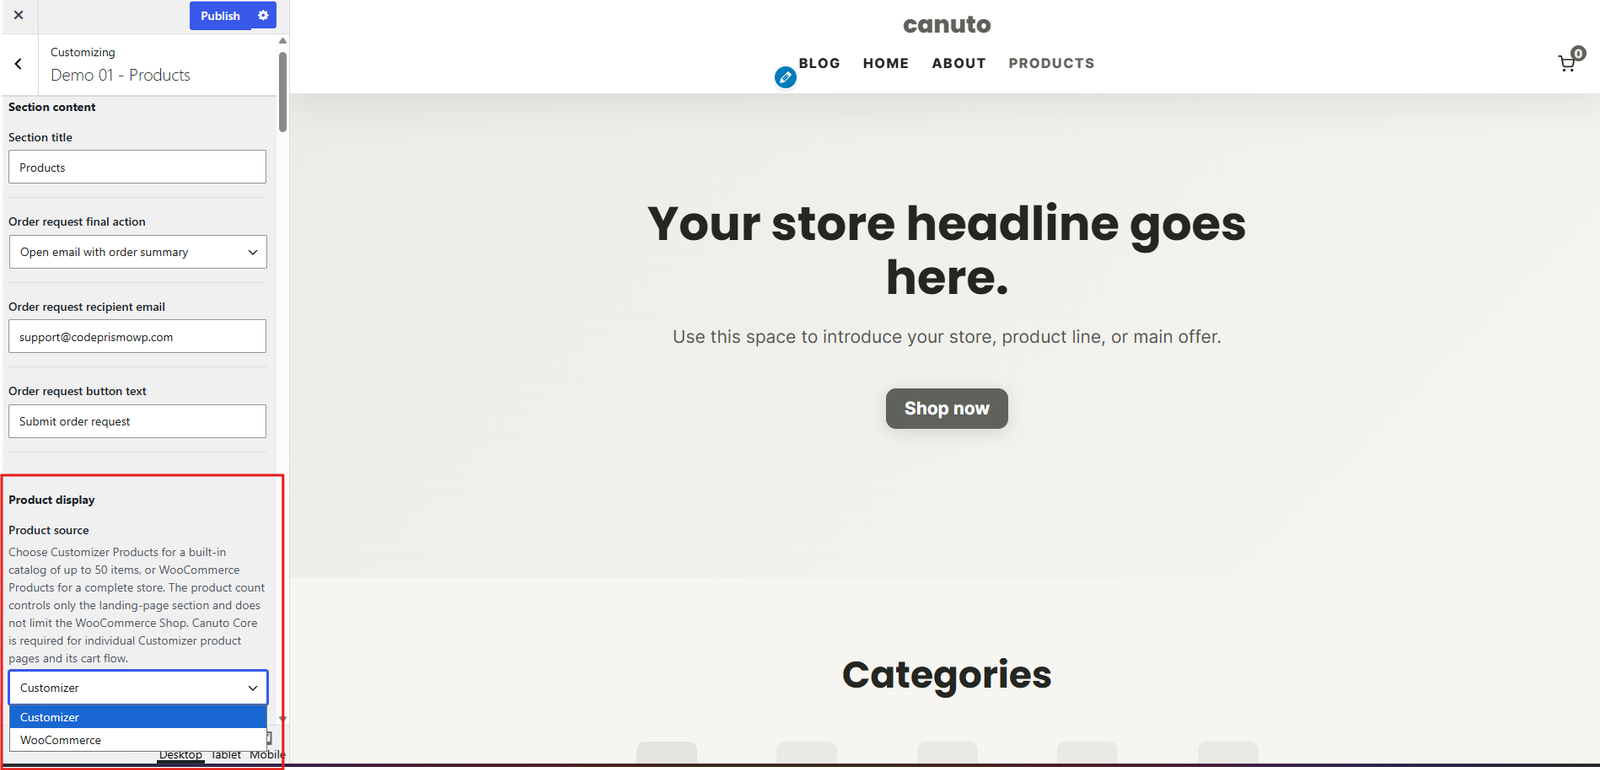
When both WooCommerce and Canuto Core are active, the Product source selector appears in the active demo’s Products section and lets you choose Customizer or WooCommerce. With only Canuto Core available, Customizer Products are selected automatically. Without either plugin, the Customizer catalog can still appear on the homepage, but product buttons, virtual pages, and the request cart are unavailable.
13. Product Categories
Customizer categories
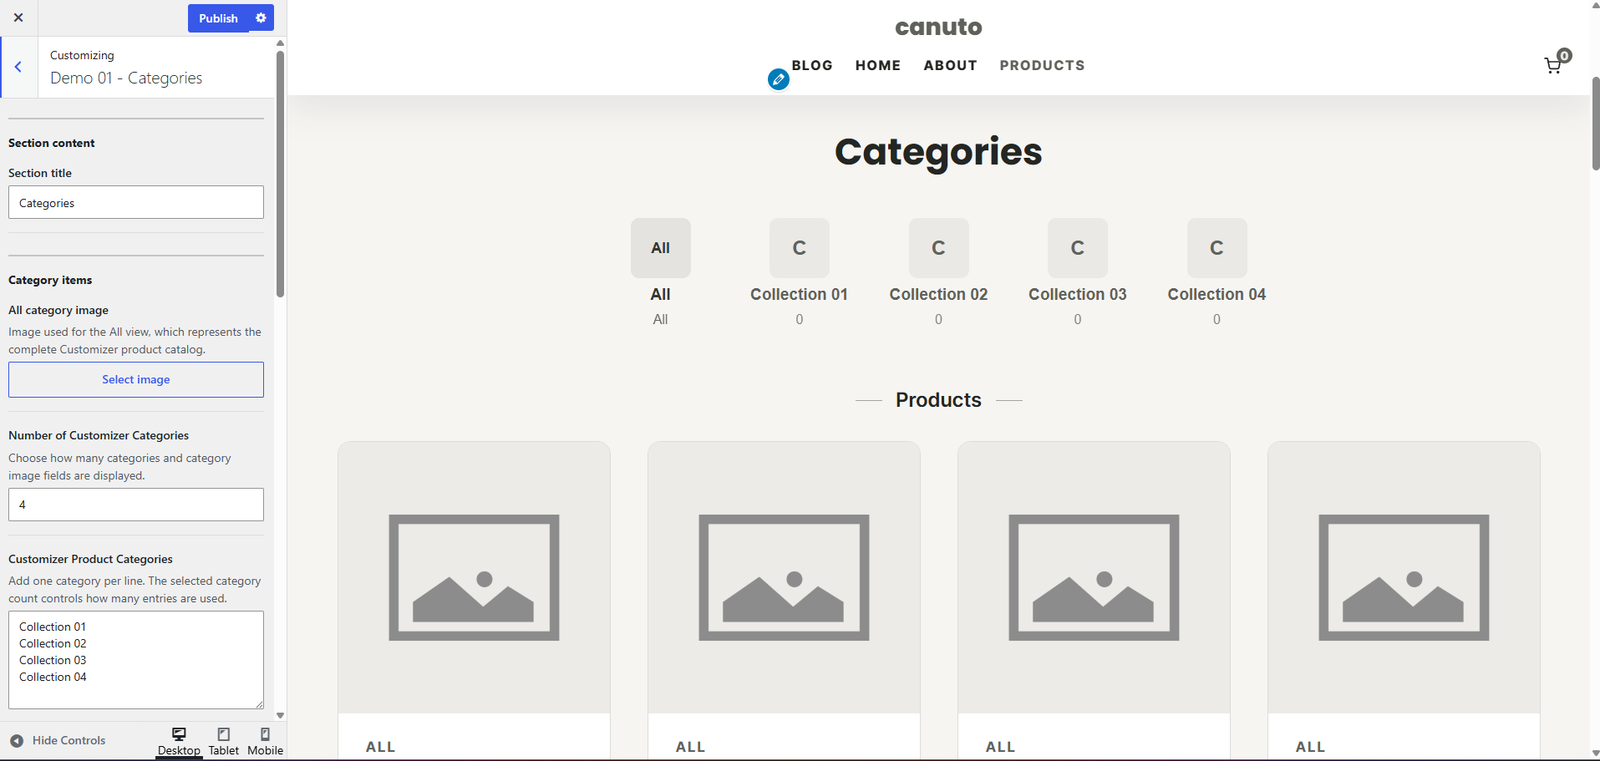
Enter one category per line in the active demo’s Categories or Products controls. Assign categories to products using their category field. These names are theme settings, not WordPress taxonomies. With Canuto Core active, they can have virtual category views. After changing a category list, choose Publish and reload the Customizer if dependent product controls have not refreshed.
WooCommerce categories
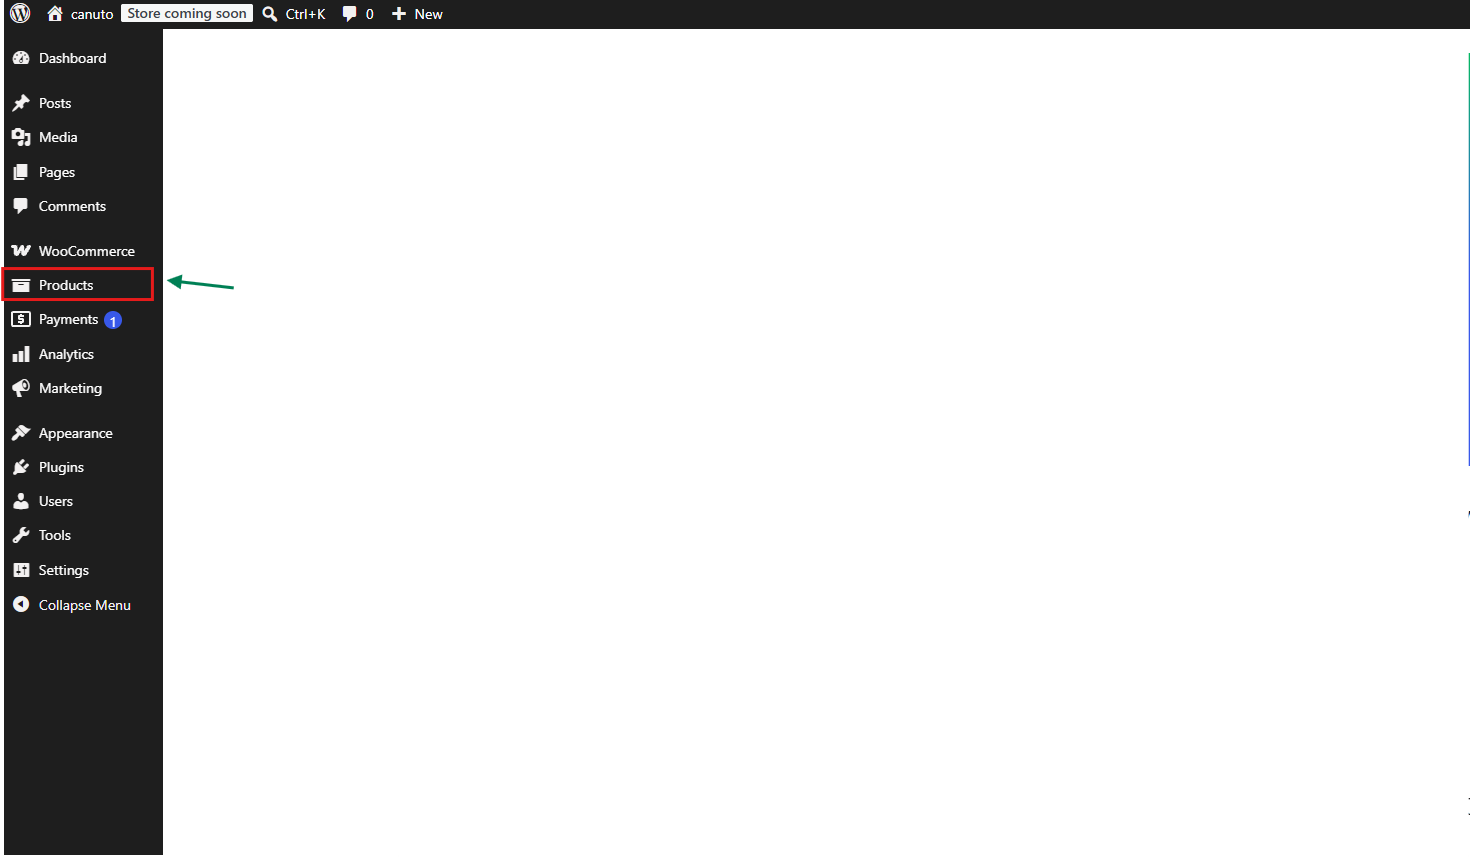
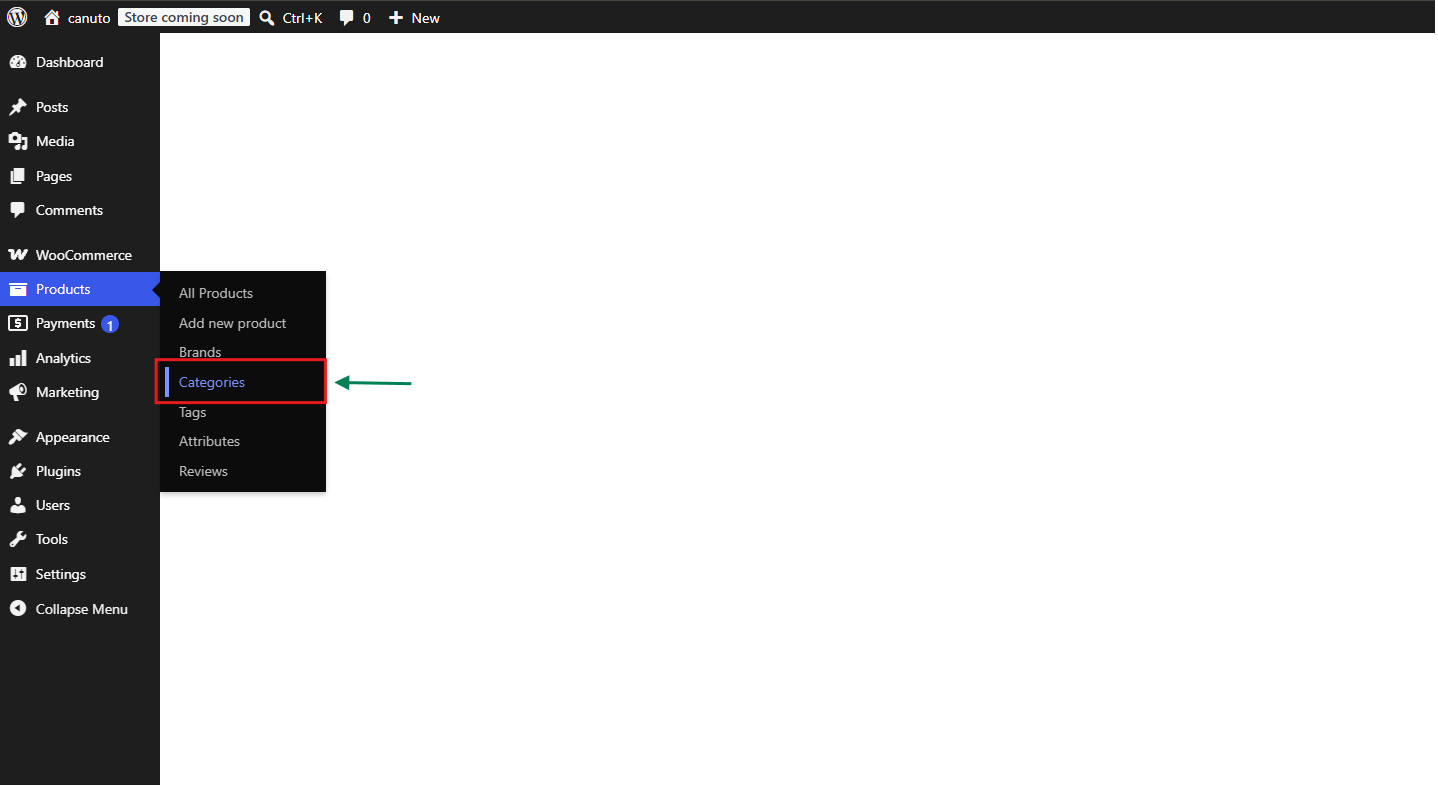
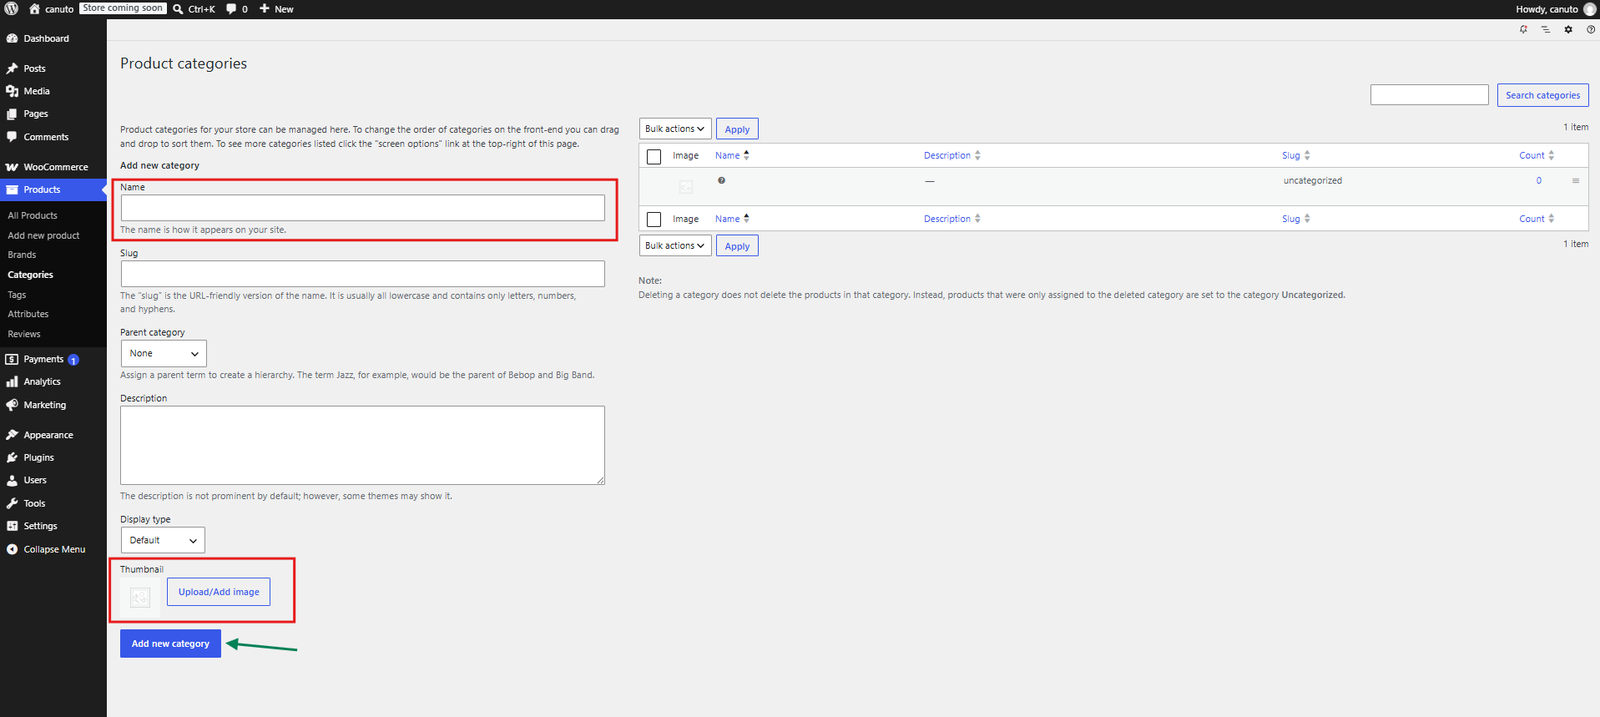
Manage WooCommerce categories under Products > Categories and assign them from the WooCommerce product editor. Their archives and filtering are handled by WooCommerce and styled by Canuto.
Demo-specific Categories content
Demo 03 provides Section title, Section description, and Link text. Demo 04 also provides Badge text. The link destination is supplied by the current product architecture; do not look for a separate destination control in these sections.
14. Testimonials, FAQ, and Contact
Testimonials
Demo-specific Testimonials controls manage multiple entries. Depending on the active demo, an entry can include a name, testimonial text, image or avatar, and supporting metadata. Entry quantity and presentation vary by demo. Use Section Visibility and Section Order to control the section without assuming the same card layout across all demos.
FAQ
Canuto - FAQ provides the Section title and multiple Question and Answer items. The frontend presents the items as an accordion. Hiding FAQ through its visibility control does not delete saved questions or answers.
Contact
Open the active demo's Contact section and configure only the native content needed by that layout:
- Demo 01: section content, address, opening hours, phone, email, social links, button text and URL, and optional map.
- Demos 02 and 03: section content, address, opening hours, phone, email, social links, button text and URL, and optional image.
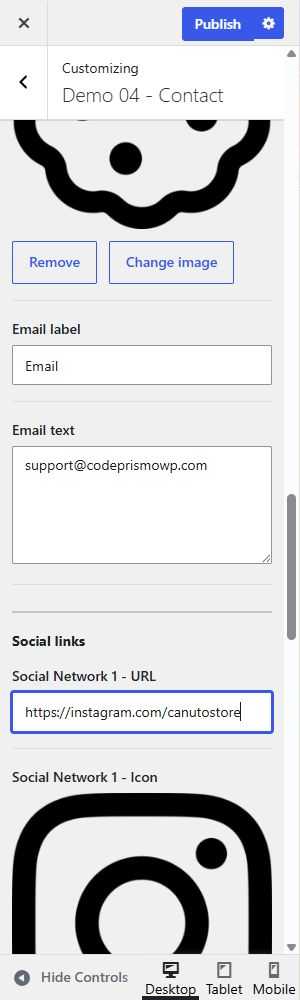
- Demo 04: Eyebrow, Section title, Section description, address, opening hours, phone, email, social links, button text and URL, and optional image.
Enter the public contact details that visitors should use, verify telephone and email links, and choose Publish. Social URLs and icons are configured under the Social links heading in Contact.
16. Section Visibility and Order
| Section Visibility | Section Order | |
|---|---|---|
| Controls | Whether a supported section appears. | Where a supported section appears. |
| Effect | Show or hide. | Reorder. |
| Per demo | Yes, except for the intentionally shared FAQ visibility. | Yes. |
Visibility
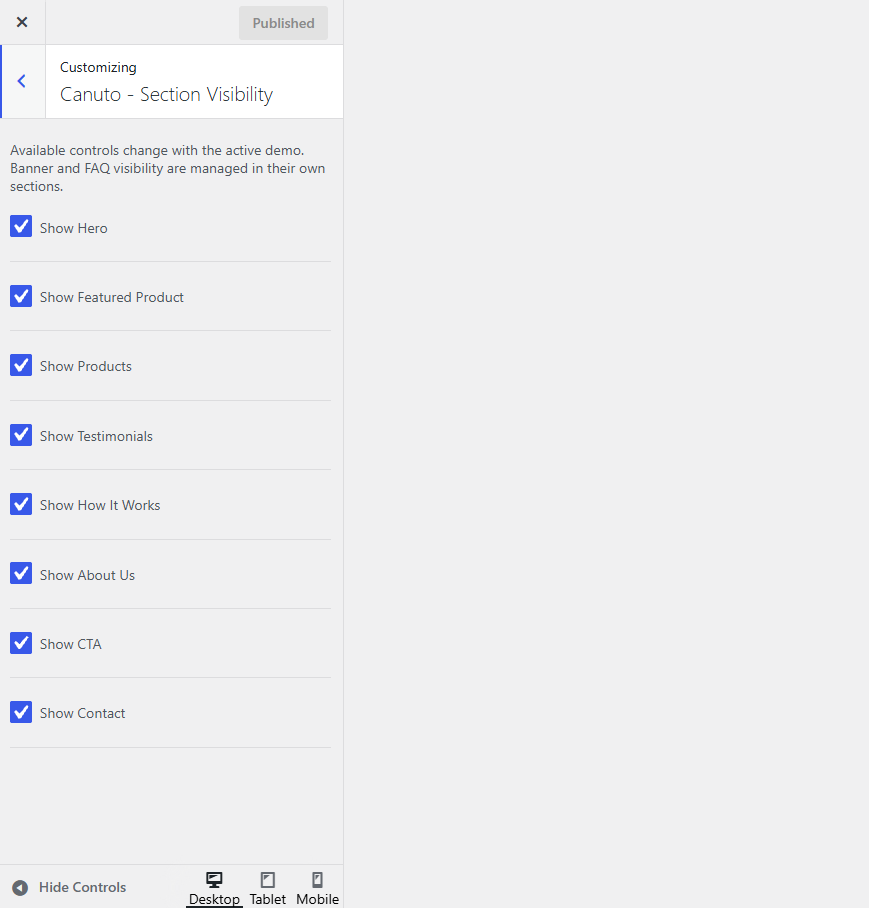
Canuto - Section Visibility shows or hides supported homepage sections. The available options depend on the Active Demo. Hiding a section does not delete its saved content. Choose Publish to save the new visibility state.
Demo 02 can expose How It Works. Demo 04 uses Benefits, not How It Works, and includes a separate CTA visibility option. Other visibility choices follow the sections supported by the selected demo.
Order
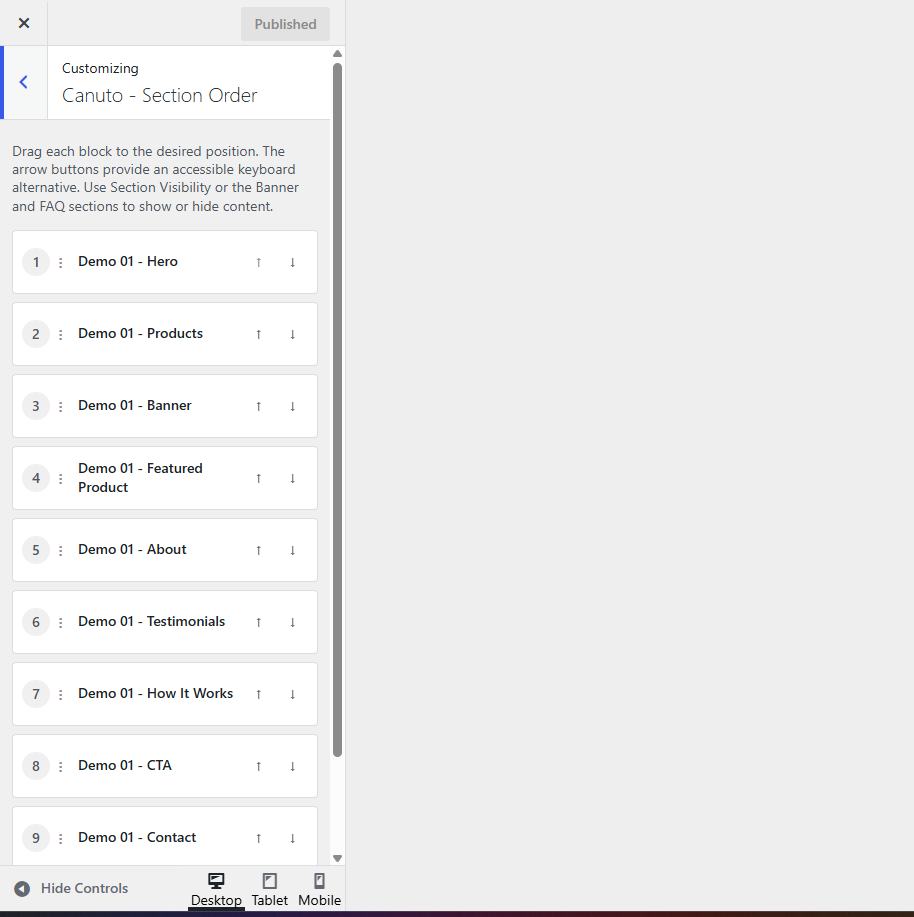
Canuto - Section Order determines the position of supported landing-page blocks. Drag a block into position or use its accessible arrow controls, then choose Publish. Only sections supported by the Active Demo enter its order list. Visibility and order are separate, and each demo keeps its saved order.
| Demo | Default section order |
|---|---|
| Demo 01 | Hero, Products, Banner, Featured Product, About, Testimonials, How It Works, CTA, Contact, FAQ |
| Demo 02 | Hero, Products, Banner, Featured Bundle, About, Testimonials, CTA, Contact, FAQ, Benefits, How It Works |
| Demo 03 | Hero, Products, Banner, Featured Products, About, How It Works, Testimonials, CTA, Contact, FAQ |
| Demo 04 | Hero, Products, Banner, About, Testimonials, Contact, FAQ, Benefits, CTA |
17. Using Customizer Products
Customizer Products provide a lightweight catalog without WooCommerce. Products are saved as theme settings; they are not a custom post type and do not create entries in the WordPress Products or Posts menus.
STEP 1
Enable Canuto Core
Install and activate Canuto Core when individual product pages, virtual category pages, product actions, or the request cart are required. The homepage catalog can still be displayed without the Core, but those additional features are unavailable.
STEP 2
Choose the Product Source
Open Appearance > Customize and the active demo’s Products section. When WooCommerce and Canuto Core are both active, select Customizer under Product source. With only Canuto Core available, Customizer Products are selected automatically.
STEP 3
Set the Product Count
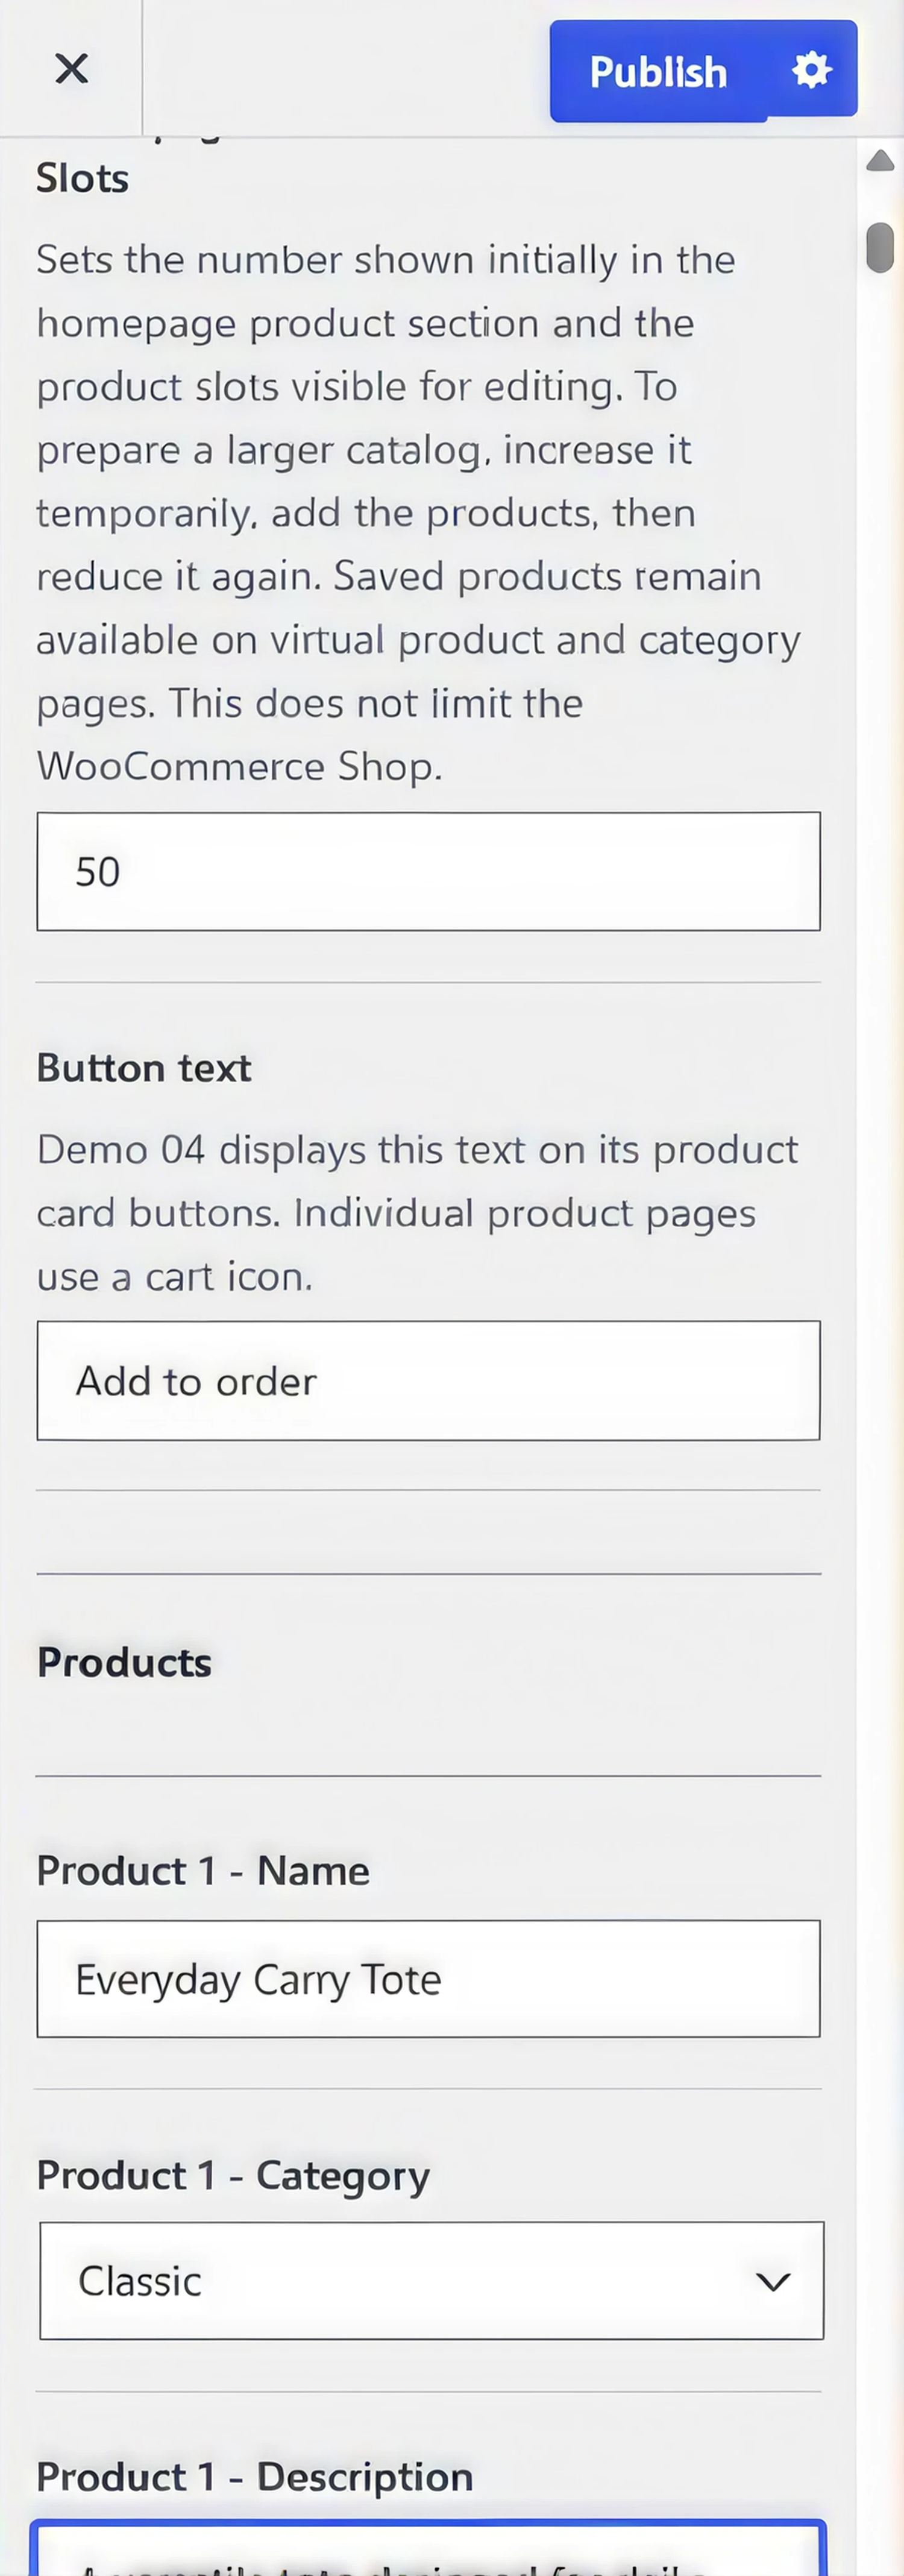
Set Homepage Product Count and Editable Slots from 1–50. It controls how many items initially appear in the homepage Products section and how many editing slots are visible; it does not limit the WooCommerce Shop catalog.
Reducing the count does not delete previously saved product data. Configured products above the reduced count remain available to virtual product and category pages, and some demos provide Show More / Show Less behavior for the homepage list.
STEP 4
Configure Product Slots
Each visible slot provides the following controls. Labels include the product number, for example Product 1 - Name:
- Name, Category, Description, and Price.
- SKU (optional display field) and Availability (display text, not managed inventory).
- Image and up to three Gallery image controls.
- Additional information, entered one item per line, for example
Weight: 250g.
The section also provides Customizer Product Button Text. Demo 04 displays this text on homepage product buttons; Demos 01, 02, and 03 primarily use an icon or visual action on the homepage, while the text is used mainly on the individual Customizer product page.
STEP 5
Publish the Configuration
Choose Publish after configuring the product source, count, and visible slots.
STEP 6
Verify the Virtual Product Page
With Canuto Core active, open a configured Customizer product’s virtual page. It can display the main image and gallery, category, name, displayed price, description, quantity and request-cart action, optional SKU, Availability text, Additional information, and related Customizer products.
STEP 7
Test the Product Action
Use the product action and verify the request cart and its configured final email or external URL action. Prices and Availability are informational: this flow does not provide WooCommerce variations, managed inventory, WooCommerce SKU workflows, WooCommerce Checkout, payment processing, or WooCommerce orders.
18. Using WooCommerce Products
Use WooCommerce when the website requires a complete store with simple or variable products, managed inventory, SKUs, categories, cart, checkout, customer accounts, and orders.
WooCommerce Setup
- Install and activate the latest compatible WooCommerce release from Plugins > Add New Plugin.
- Complete the necessary WooCommerce onboarding and confirm the assigned Shop, Cart, Checkout, and My Account pages.
- Create product categories under Products > Categories.
- Create products under Products > Add New and configure their images.
- When both WooCommerce and Canuto Core are active, open the active demo’s Products section and select WooCommerce as the product source.
- Test the Shop, single-product, Cart, and Checkout pages before launch.
Product Source controls which products appear in the landing page’s Products section. It does not limit or replace the WooCommerce Shop page, which continues to use the WooCommerce product catalog.
WooCommerce normally uses pages such as Shop, Cart, Checkout, and My Account. Canuto provides integration and styling for its supported WooCommerce shop and account flows, including the Shop/product archive, product category archives, single products, cart, empty cart, checkout, notices, and order-received experience.
Simple Products
A Simple product represents one purchasable item without customer-selected variations. In WooCommerce, normally configure the Product name, Regular price, optional Sale price, Product image, optional Product gallery, Short description, Description, Categories, SKU, Stock, and native Weight and dimensions when applicable.
Variable Products
A Variable product lets the customer choose between real purchasable options, such as a design, color, or size. The setup has two parts: first create an attribute that contains the choices, then create one purchasable variation for each choice. The WordPress interface follows the site's language, so the labels in the screenshots may be translated.
STEP 1
Select the Variable product type
Products > Edit Product > Product data > Variable product
- Go to Products > Add New, or edit an existing product.
- In Product data, open the product-type selector and choose Variable product.
- Add the product name, descriptions, categories, main image, and gallery as usual.
STEP 2
Create the customer-choice attribute
Product data > Attributes
- Open Product data > Attributes.
- Add or select the attribute that customers will choose, for example Design.
- Enter or select all its values. For a custom product attribute, separate values with the pipe character, for example
Ocean Pals | Curious Cat | Color Outside the Lines. - Enable Visible on the product page when the attribute should also be shown to visitors.
- Enable Used for variations. Without this option, WooCommerce treats the attribute as information only and cannot generate purchasable choices from it. Mark Used for variations only for attributes that represent an actual choice for the customer.
- Choose Save attributes.
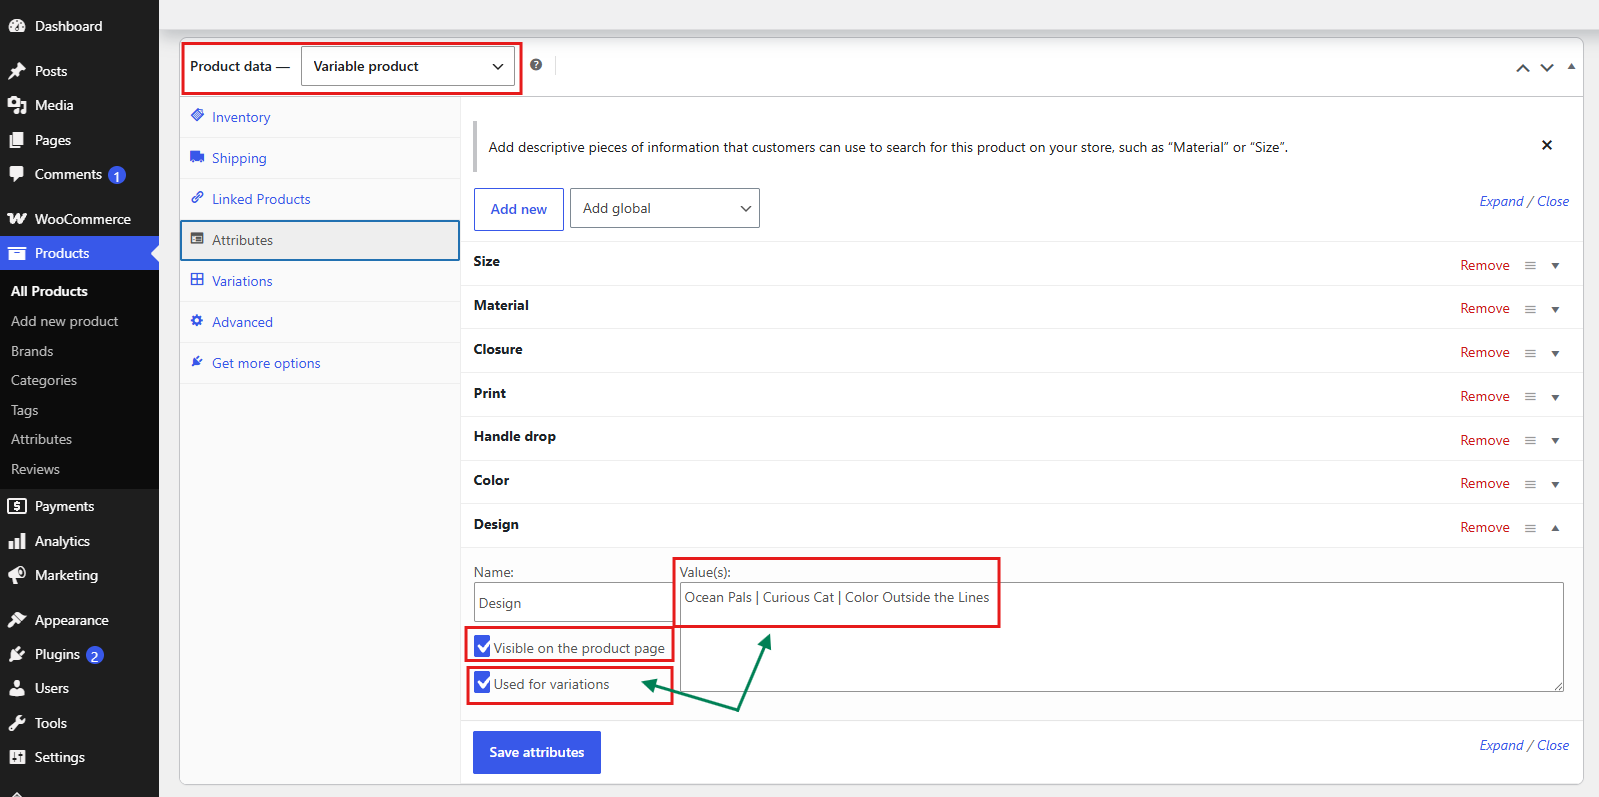
The screenshot highlights the three parts to verify: the complete list of attribute values, Visible on the product page when the attribute should also appear as information, and Used for variations when the customer must choose one of those values.
STEP 3
Decide what is a variation
CUSTOMER CHOICE
The customer selects it
- Used for variations
- Yes
- Examples
- Design, Size, Color, Flavor
- Appears in
- Variation selector and, when visible, Additional Information
PRODUCT SPECIFICATION
It only describes the product
- Used for variations
- No
- Examples
- Material, Closure, Care, Print Method
- Appears in
- Additional Information
For the Storybook Print Tote, the Design attribute can contain Ocean Pals, Curious Cat, and Color Outside the Lines. Material, Closure, Print, Handle drop, and Color remain fixed specifications instead of purchase options.
When Weight, Length, Width, and Height represent real product or shipping data, use the native fields under Product data > Shipping. Do not create duplicate custom attributes for the same data.
STEP 4
Generate the variations
Product data > Variations
- Open Product data > Variations.
- Choose Generate variations and confirm the WooCommerce prompt. WooCommerce creates one variation for each available combination of attributes marked Used for variations.
- If only one specific option is needed, Add manually can create a variation without generating every combination.
- Expand each generated variation and check that the correct attribute value is selected.
The expected result for this example is three separate entries: Variation 1 — Design: Ocean Pals, Variation 2 — Design: Curious Cat, and Variation 3 — Design: Color Outside the Lines. Each entry must be configured and saved independently.
STEP 5
Configure each variation
Each variation is a separate purchasable item. Configure it carefully, even when most fields are inherited from the parent product:
- Image
- Choose the image associated with this variation when the customer’s choice changes the product appearance.
- SKU
- Use a unique SKU when the variation needs individual identification.
- Enabled
- Keep the variation enabled so customers can select and purchase it.
- Price
- Set the Regular price required for purchase and add a Sale price only when applicable.
- Stock
- Enable stock management when this variation needs its own quantity, stock status, backorder setting, or low-stock threshold.
EXAMPLE — STORYBOOK PRINT
- Image
- Ocean Pals tote
- SKU
CBG-STB-002-OCE- Stock
- 15
- Price
- $32
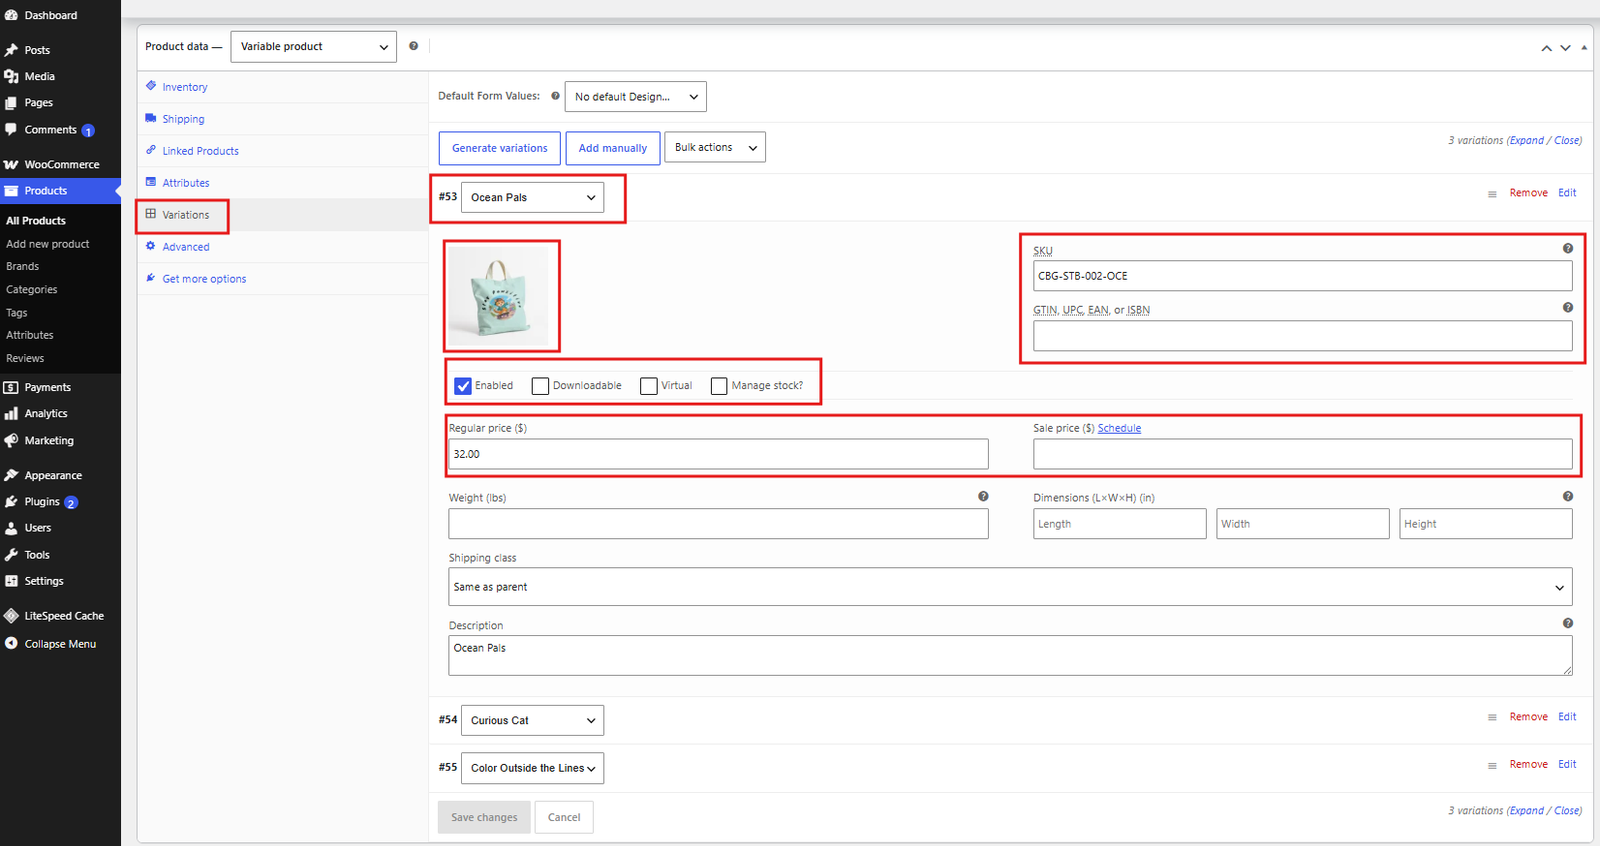
For every expanded variation, confirm the selected Design at the top, choose its image, enter a unique SKU when needed, keep the item enabled, configure stock management when required, and provide the Regular price. A variation without a price cannot be purchased.
- Repeat the checks for every variation.
- Choose Save changes in the Variations panel.
- Choose Update or Publish for the product.
STEP 6
Review the result
When the customer selects an available variation, price, stock, SKU, and image follow the selected WooCommerce data. Quantity and Add to Cart remain available for the in-stock choice.
PURCHASE AREA
What the customer chooses
- Design
- Price and stock
- Quantity
- Add to Cart
ADDITIONAL INFORMATION
Fixed product specifications
- Material and Closure
- Care and Print Method
- Weight and Dimensions
- Other visible specifications
The Canuto Additional Information accordion can display visible attributes, including an attribute that is also used for variations. Native Weight and Dimensions come from the WooCommerce Shipping data when configured. Shipping Class is standard WooCommerce data, not a special Canuto feature.
- Open the product on the storefront in a new tab.
- Select every available value and confirm that its image, price, stock message, SKU, quantity control, and Add to Cart state update correctly.
- Open Additional Information and confirm that all attributes marked visible appear there, including a variation attribute when both options are enabled.
- Add one in-stock variation to the cart and complete a test checkout before launch.
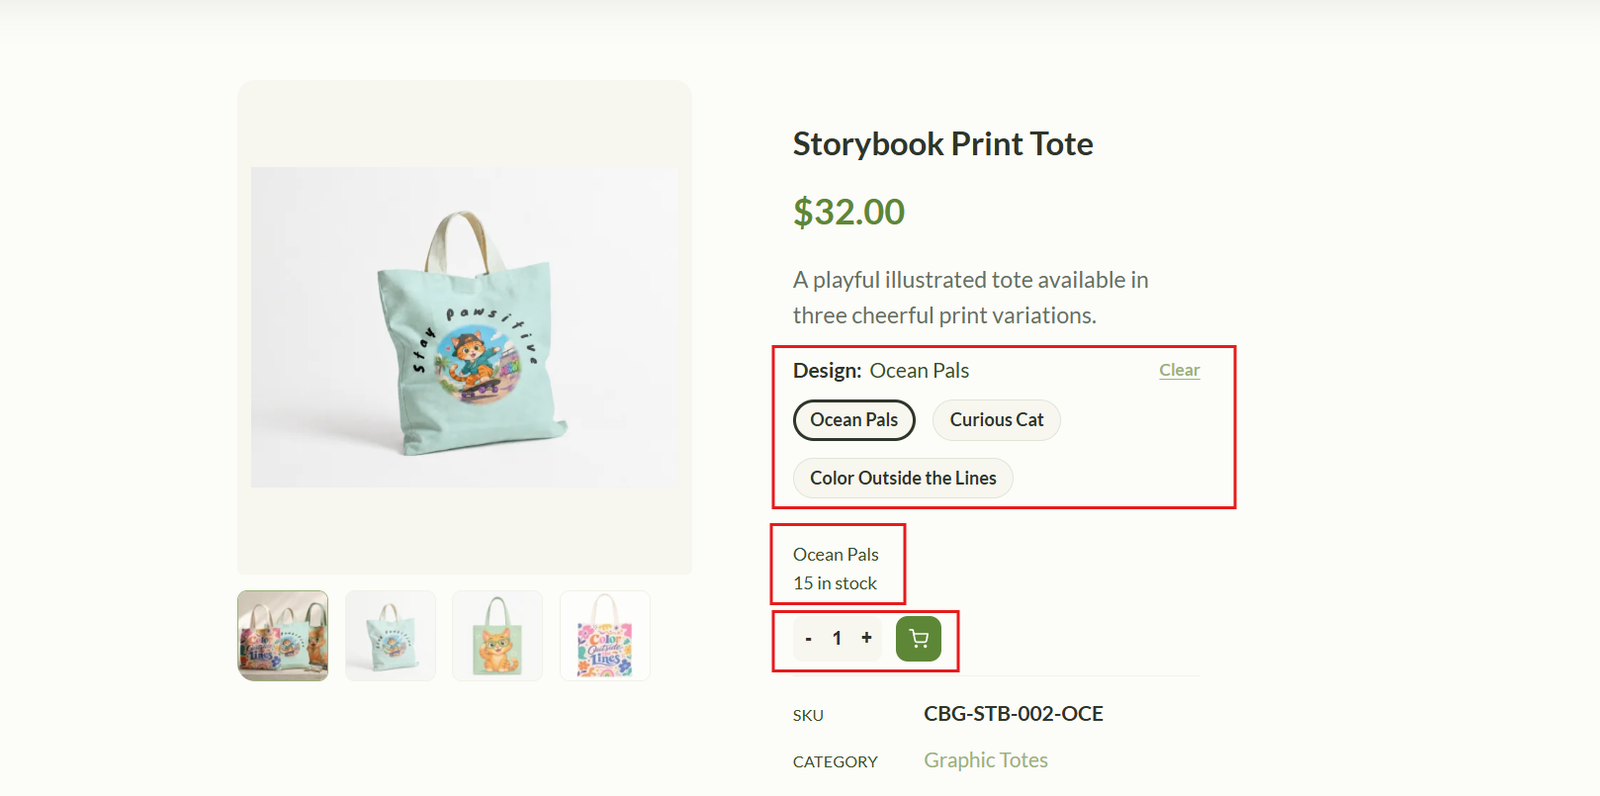
After choosing a Design, verify that the matching image, price, stock message, SKU, quantity control, and Add to Cart state all belong to the same variation. Selecting another Design should update the variation-specific data rather than only changing the label.
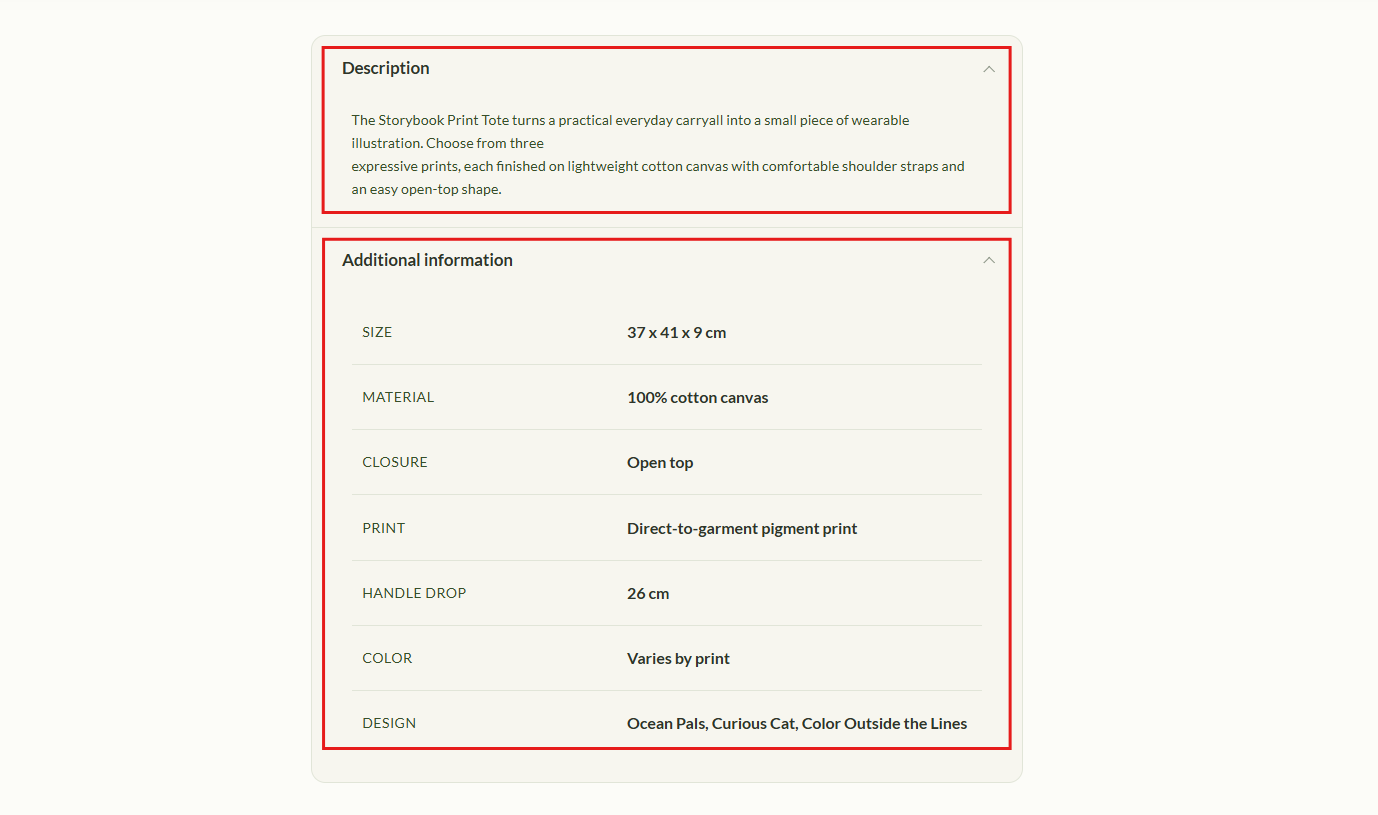
Open Additional Information and compare the displayed values with the product data. Fixed specifications such as Size, Material, Closure, Print, Handle drop, and Color should appear when they are marked visible. The Design attribute can appear there as well when both Visible on the product page and Used for variations are enabled.
WooCommerce is an external, optional plugin and must be installed separately. WooCommerce remains responsible for store data and transactions. Canuto does not promise compatibility with specific gateways or with subscriptions, bookings, memberships, add-ons, or other extensions unless those products are tested separately.
For advanced WooCommerce configuration such as payments, taxes, shipping, coupons, reports, orders, and store management, refer to the official WooCommerce documentation.
19. Carts and Checkout
Customizer order request cart
With Canuto Core active, Customizer product buttons add items to a browser-based request cart. In the Products section, choose whether the final action opens an email or an external URL, then configure the recipient or destination and the button text.
The request contains item and estimated-total information. It does not create a WooCommerce order, collect payment, validate inventory, or establish a final price. Final prices and availability must be confirmed by the store.
WooCommerce cart and checkout
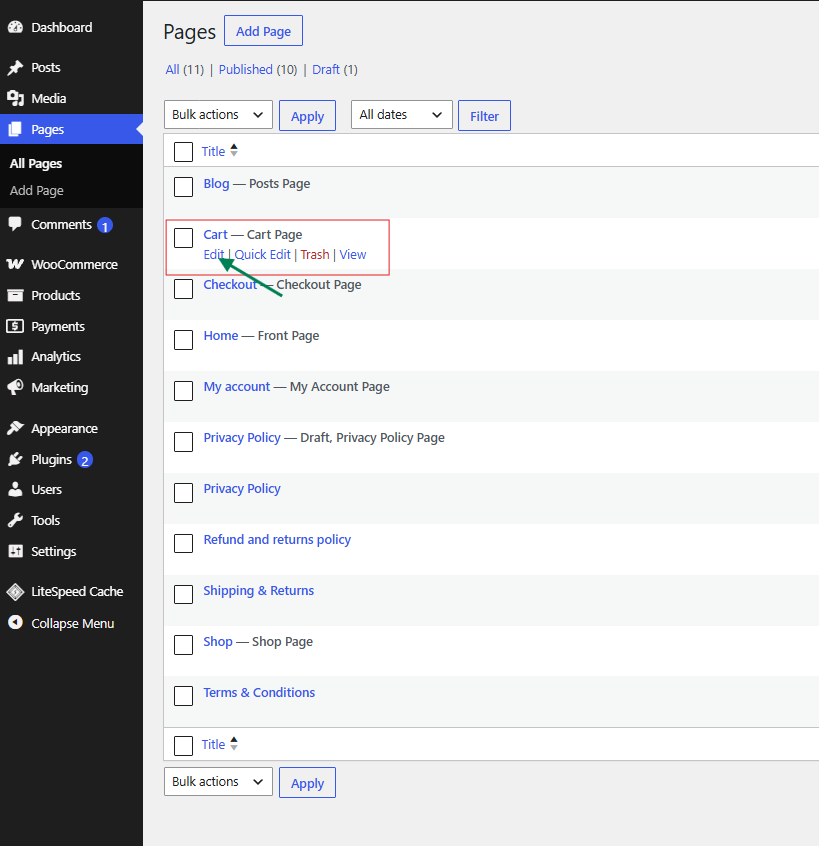
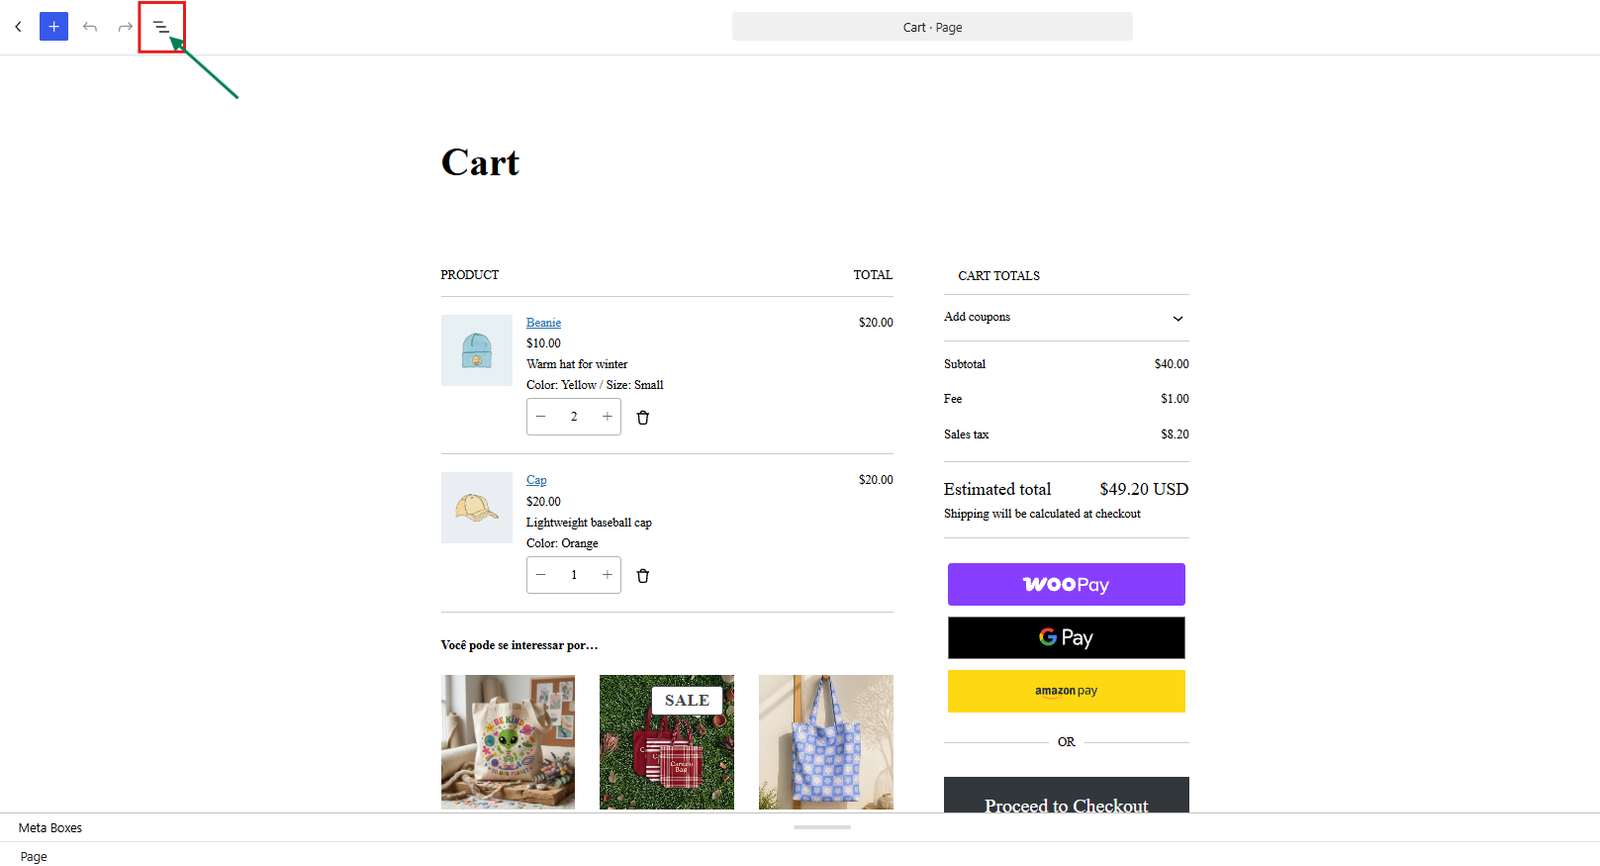
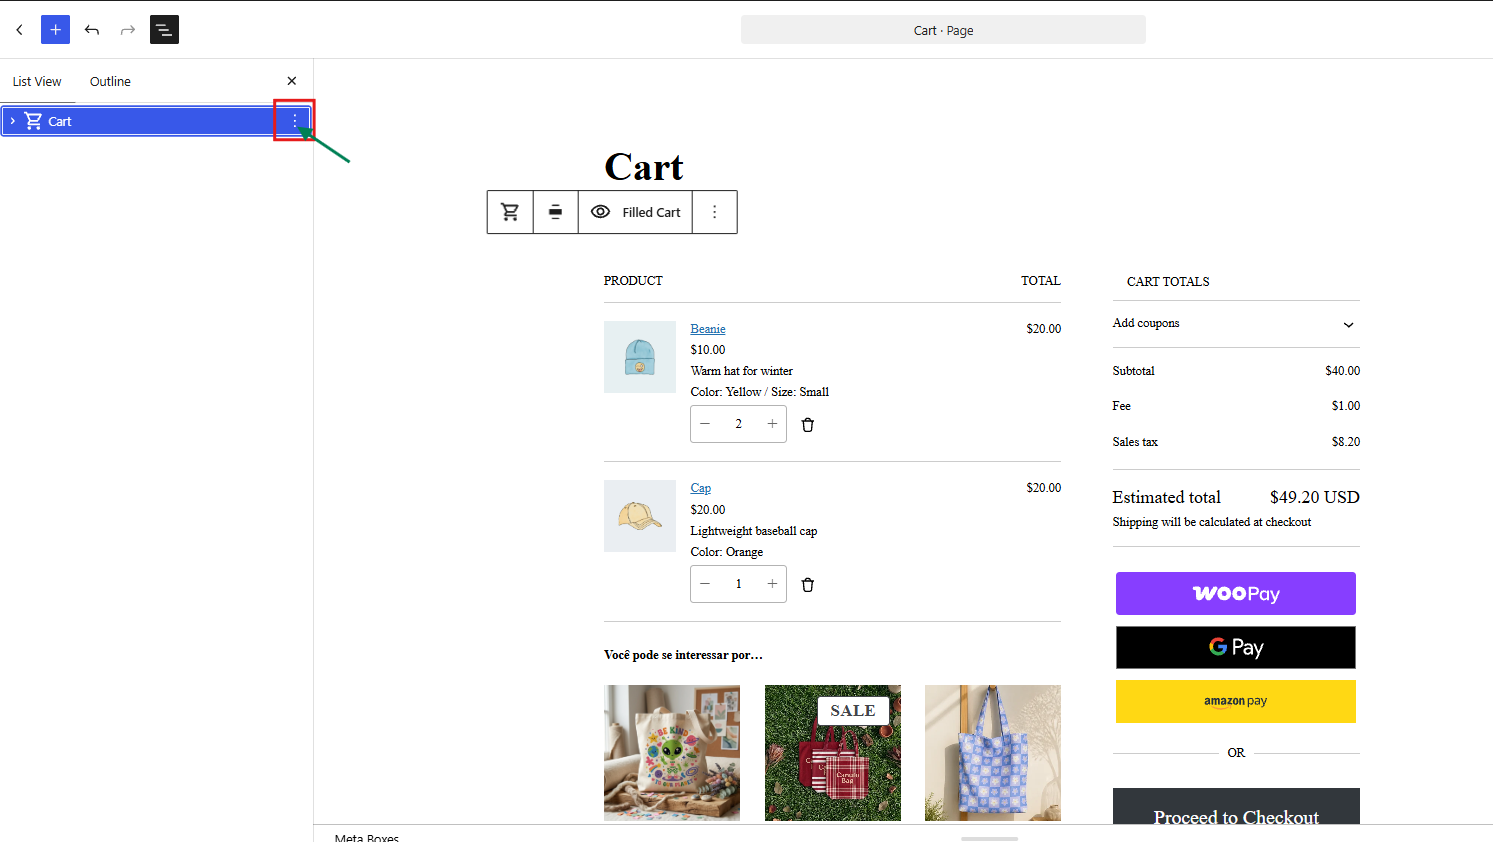
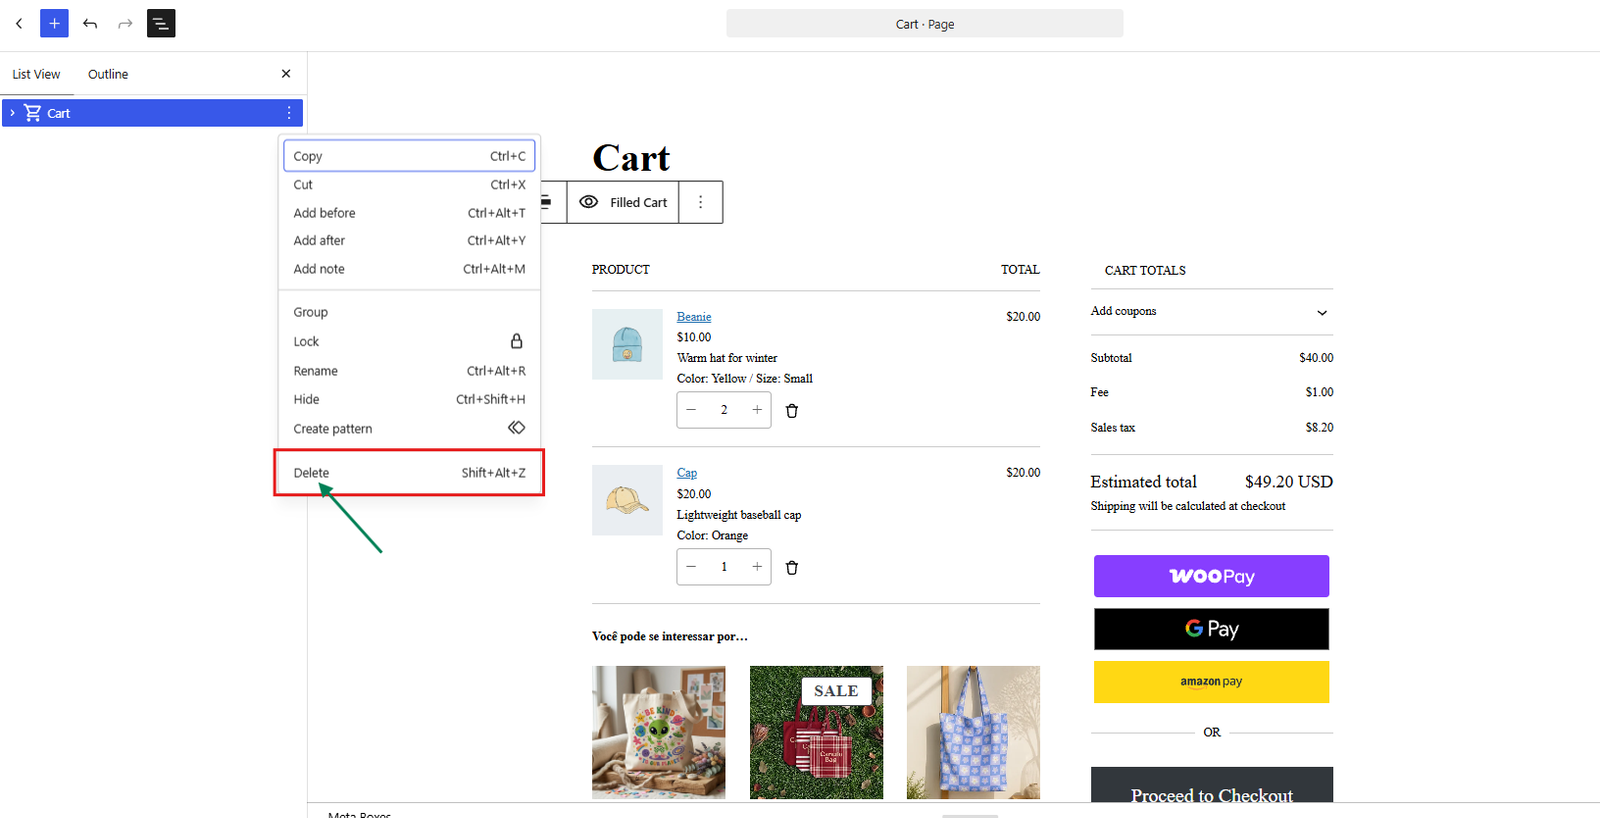
WooCommerce provides quantities, coupons, totals, checkout fields, payment gateways, order creation, customer accounts, and order management. Canuto’s custom Cart and Checkout layouts shown in the live demos use WooCommerce’s classic shortcode pages.
Cart Page
- Go to Pages > All Pages.
- Find the page assigned as the Cart page and click Edit.
- Open the WordPress List View.
- Select the parent WooCommerce Cart block.
Remove the parent Cart block, not its internal blocks such as Filled Cart, Cart Items, or Cart Line Items.
- Open the parent block’s options menu and choose Delete.
- Add a WordPress Shortcode block.
- Enter
[woocommerce_cart].
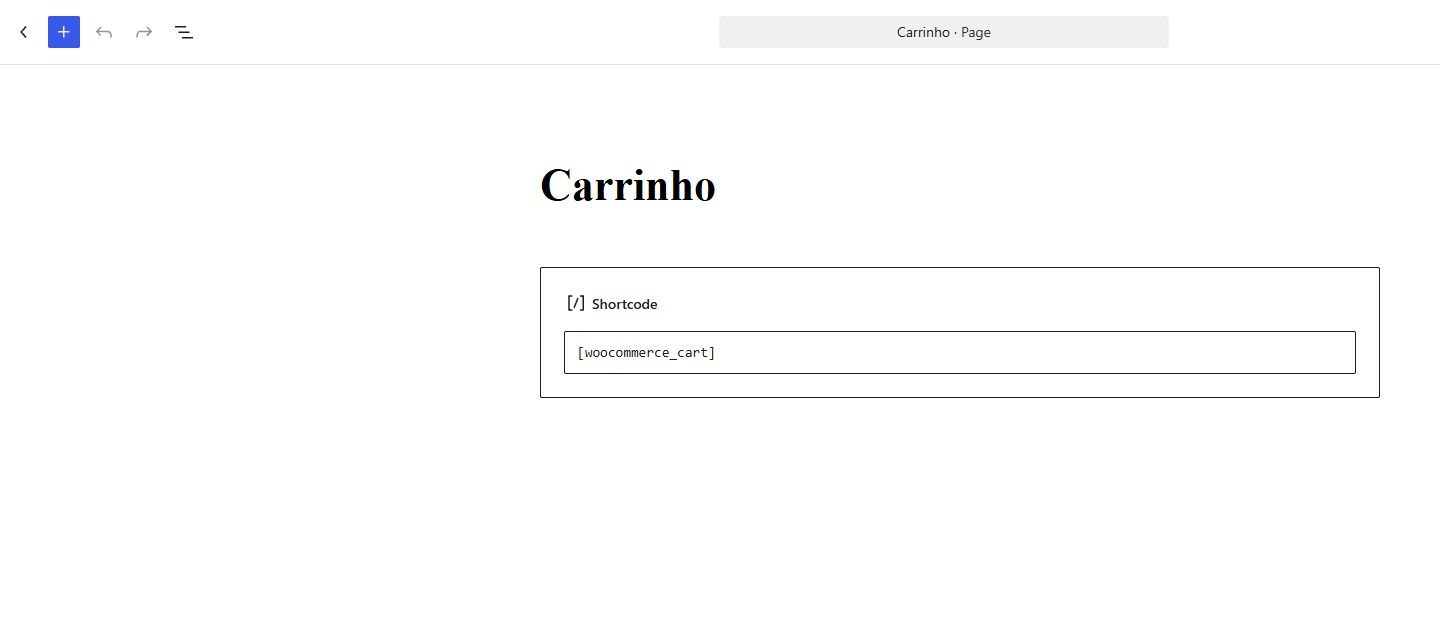
- Save or publish the page.
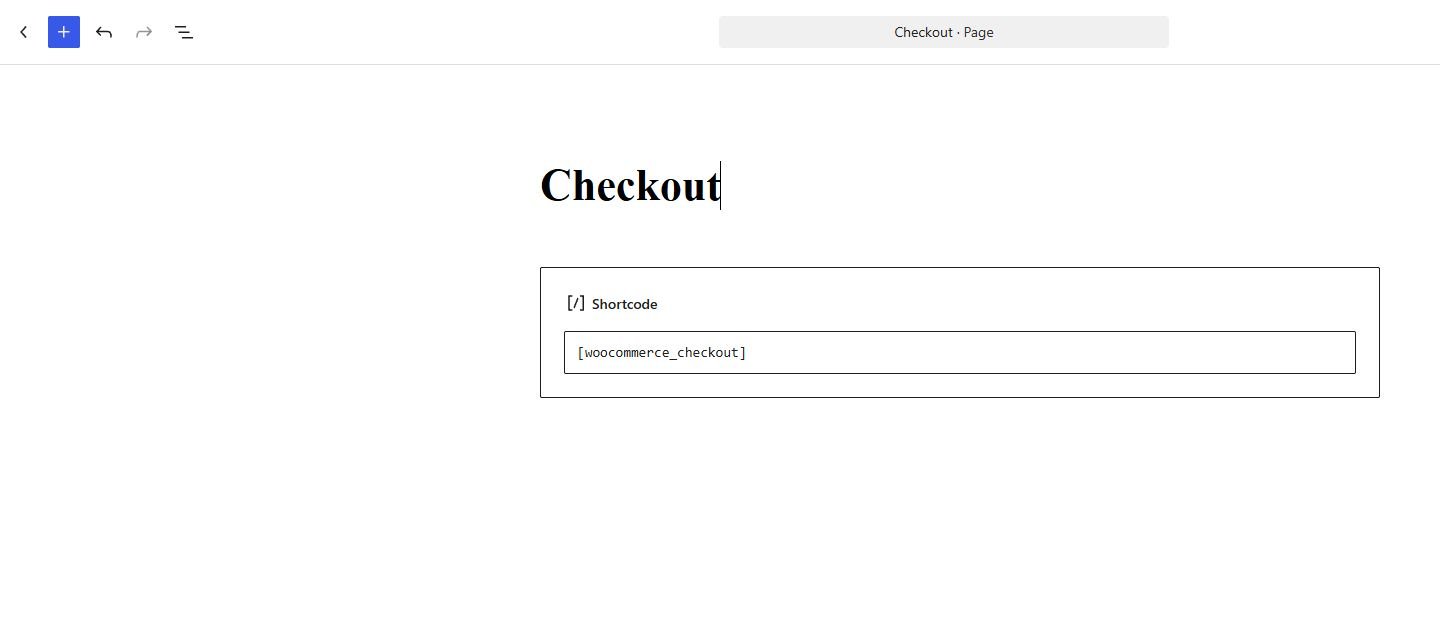
Checkout Page
Repeat the same process on the Checkout page: remove the parent WooCommerce Checkout block, add a WordPress Shortcode block, enter [woocommerce_checkout], and save or publish the page.
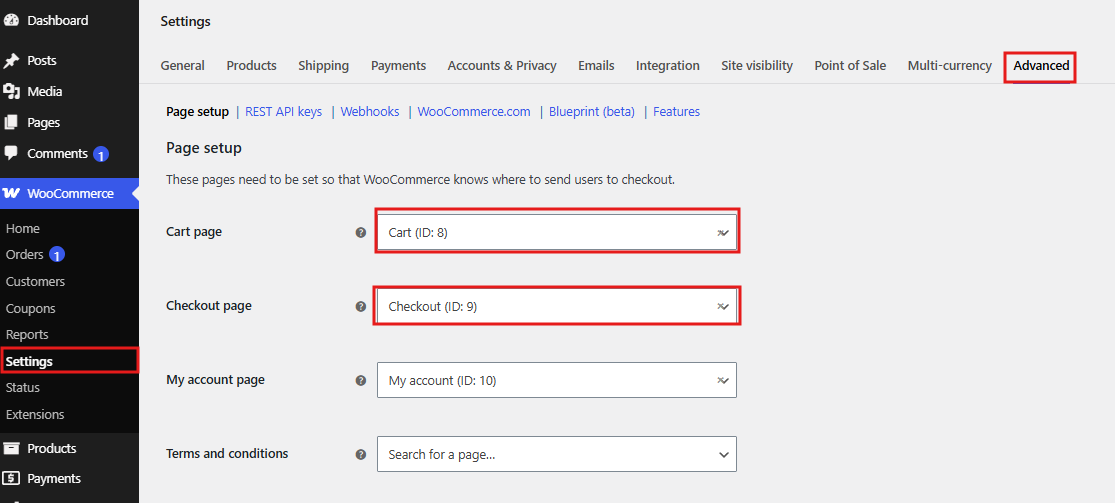
Page Assignments
- Go to WooCommerce > Settings > Advanced.
- Under Page setup, select the correct shortcode-based page for Cart page and Checkout page.
- Choose Save changes. No other WooCommerce settings need to be changed for this step.
Optional: Keep Product Pages Cleaner
Some payment gateways, such as Stripe, can display Express Checkout buttons like Apple Pay and Google Pay directly on individual product pages. These buttons are provided by the gateway, and their appearance and placement can vary by plugin or provider. Canuto neither forces nor blocks them.
If you prefer a cleaner product page similar to the Canuto demos, open the corresponding payment gateway settings and review its Express Checkout options.
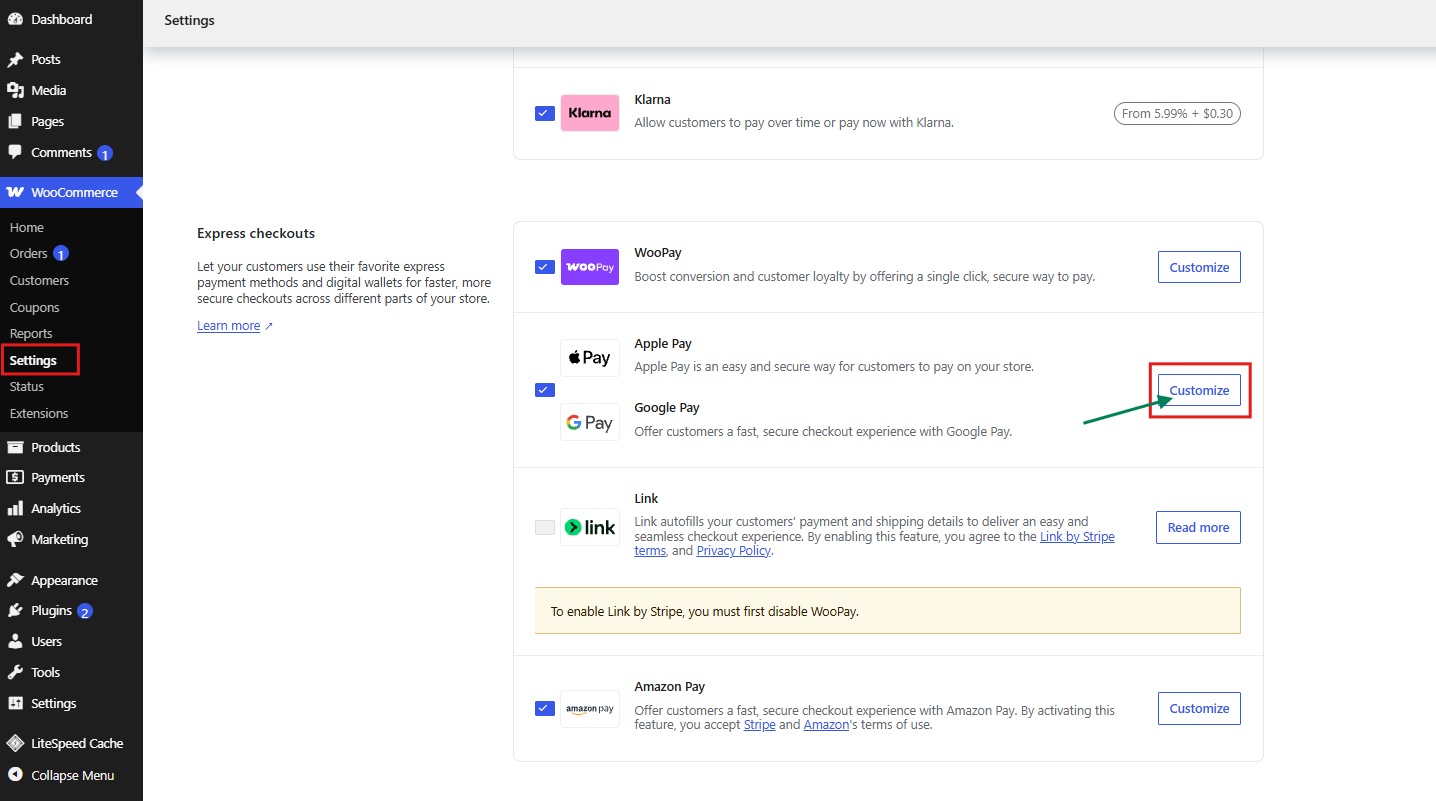
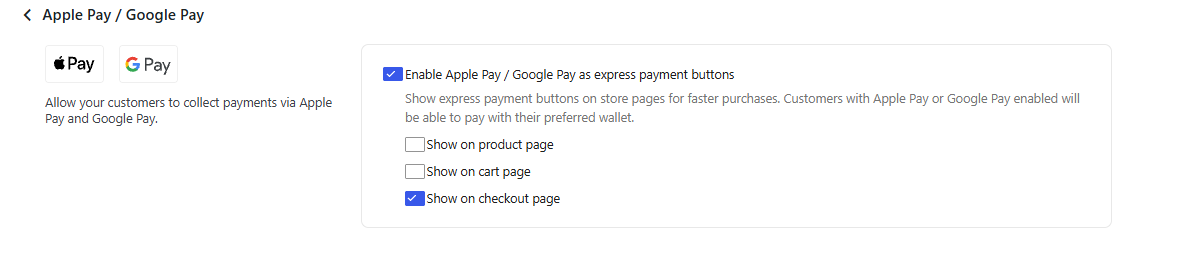
This step is completely optional. You can keep Express Checkout enabled on product pages if it better suits your store, or continue displaying the buttons in other supported locations such as the Cart or Checkout.
If you use multiple payment gateways that provide Express Checkout options, review the same placement setting in each gateway.
Test the complete Cart and Checkout purchase flow before launch.
20. Blog and WordPress Pages
Canuto includes presentation for the Posts page, single posts, archives, search results, standard pages, comments, and the 404 page. It supports featured images, automatic feed links, HTML5 markup, a custom logo, custom header, custom background, and responsive embeds.
Normal pages and posts use the WordPress editor. Homepage landing sections remain managed by the Customizer.
STEP 1
Create the Posts Page
Go to Pages > Add New and create a separate page for the Blog. The page content can remain empty because WordPress supplies the posts listing.
STEP 2
Assign the Posts Page
Go to Settings > Reading and select the new Blog page as the Posts page. When using a static homepage, the Homepage and Posts page must be different pages.
STEP 3
Create a Blog Post
Go to Posts > Add New, add the post title and content, and publish it.
STEP 4
Set the Featured Image
Assign a Featured Image when available. Canuto uses featured images in compatible blog listings and single-post layouts.
STEP 5
Configure the Optional Blog Sidebar
To display sidebar content, go to Appearance > Widgets and add standard WordPress widgets or blocks to Blog Sidebar. Useful examples include Search, Recent Posts, Categories, and Archives. Canuto does not require custom widgets. The sidebar is optional and appears only when it contains active content.
STEP 6
Verify the Blog Layout
Open the Blog page and a Single Post to verify the posts listing, Featured Image, post content, categories, and optional sidebar. Also test a category archive, a date archive when used, and Search results.
Standard Pages
Canuto supports normal WordPress Pages, Search results, Archives, the 404 page, Privacy Policy, and Terms pages. Create their content with the WordPress editor and use the Default template unless a separate plugin or project requirement specifies otherwise.
21. Block Editor
Canuto provides editor styles so backend content more closely matches the frontend. It supports WordPress block styles, responsive embeds, and wide/full alignment.
- Canuto Primary: a registered style for the core Button block.
- Simple call to action: a registered block pattern containing a centered heading and paragraph.
Theme landing sections remain controlled through the Customizer; the block editor is used for normal page and post content.
22. Translation
The theme text domain is canuto and its translation template is /languages/canuto.pot. The companion plugin uses canuto-core and /languages/canuto-core.pot. The theme also provides wpml-config.xml for translatable Customizer settings used by compatible multilingual workflows.
- Open the relevant POT file in a translation application such as Poedit, or use an external optional tool such as Loco Translate.
- Create a PO translation for the desired locale. Do not edit the POT template as the translated language file.
- Save the generated PO and MO files with the locale suffix, for example
canuto-pt_BR.poandcanuto-pt_BR.mo. - Place custom translations in the WordPress language directories so they are not lost during updates:
/wp-content/languages/themes/for the theme and/wp-content/languages/plugins/for Canuto Core.
23. Google Fonts
Canuto can load selected Google Fonts remotely; these font files are not bundled locally with the theme. When a Google Font is selected, the visitor's browser may connect to the font provider to retrieve it. The Typography controls also include system font choices that do not require a Google Fonts download.
24. Child Themes and Code Customization
Use the Customizer for routine design and content changes. If PHP templates or theme files must be changed, create a standard WordPress child theme with Template: canuto in its stylesheet header. A prebuilt child theme is not included.
Do not edit the parent theme directly: replacing or updating the parent theme will overwrite those changes. Back up the site before any code customization.
25. Theme Updates
Canuto does not include a proprietary automatic-update client. Download the latest package from the account or purchase source where you obtained Canuto, read the changelog, and create a complete site and database backup before updating.
- Test the update on a staging copy when possible.
- Update Canuto and Canuto Core together when both files are supplied in a release.
- Clear page, server, CDN, and browser caches.
- Test the active demo, navigation, responsive layouts, product source, Contact links, and the relevant cart flow.
26. Troubleshooting
“The theme is missing the style.css stylesheet”
Extract the complete download package and upload only canuto.zip through Appearance > Themes.
The landing layout is not the homepage
Create a page and assign it as the static Homepage under Settings > Reading. Then select the active demo in the Customizer.
Customizer product links or buttons are unavailable
Activate Canuto Core. These product-page and request-cart features belong to the companion plugin.
WooCommerce is selected unexpectedly
When WooCommerce is active and Canuto Core is inactive, the theme uses WooCommerce automatically because the full Customizer product flow is unavailable.
Customizer categories were changed but product options did not refresh
Publish the changes and reload the Customizer.
Changes are not visible
Publish the Customizer, then clear WordPress, optimization-plugin, hosting, CDN, and browser caches.
27. License and Demo Media
Canuto and Canuto Core are original CodePrismo products distributed under the GPL-2.0-or-later license.
See third-party-licenses.txt in the theme package for included third-party components, assets, and their license notices.
Recommended Image Dimensions
- Demo 03 Banner: 1600 × 520 px.
- Demo 03 CTA: 900 × 1000 px.
- Demo 04 CTA: 1600 × 1100 px.
These are recommended dimensions, not rigid upload requirements. Use properly licensed, high-quality images and review their crop in the responsive preview.
28. Support
Canuto support is available through:
- Email: support@codeprismowp.com
- Website: codeprismowp.com/
- Purchase page: use the support channel provided by the store where you obtained Canuto.
Include the Canuto, Canuto Core, WordPress, PHP, and WooCommerce versions; the active demo; reproduction steps; screenshots; and relevant error messages. Never send passwords, API keys, payment details, or private customer information.
General WordPress administration, server configuration, third-party plugin customization, custom development, and problems caused by direct source modifications may fall outside item support.
29. Changelog
See changelog.txt for the release history. The installed version is also available in Appearance > Themes > Canuto and in the theme’s style.css header.